|
|
Applying the Commandments to Very Light Roasting
As stated in the Introduction, my recommendations apply to “light-to-medium roasts.” By that, I mean roasts dropped after the completion of first crack, but before the onset of second crack. I have found that proper application of the recommendations for such roast levels has always improved results.
There is one special situation that merits mention: very light, Nordic-style roasting. Since the publication of the first edition of this book, many roasters have inquired about the appropriateness of a 20%-25% development time ratio for very light roasts (ie those dropped midway through first crack.) While the best roasts I’ve ever tasted all had DTRs greater than 20%, I wouldn’t necessarily recommend such high DTRs for roasts dropped during first crack. For example, if one were to drop a batch a few seconds after first crack began, it would be impractical to aim for a 20% DTR.
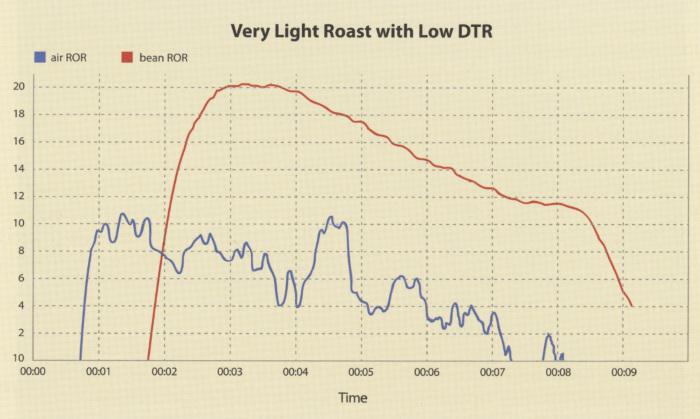
I can’t prescribe an ideal DTR range for such light roasts. Both the lightness of the roast and the amount of momentum the roast has upon hitting first crack will influence the appropriate DTR. (Think of a roast’s momentum in the final seconds as an extension of development time.) I recommend, however, that the lighter one roasts, and the lower the DTR is at the end of a roast, the higher the ROR should be as first crack begins.
First crack is like breaking a sweat.
Imagine you are running outside on a hot day. Normally, your body sweats a little each second to lower your body temperature and prevent overheating, a process known as "evaporative cooling.” Let’s pretend that your body "forgets" to sweat for 5 minutes, and that at the end at that 5 minutes, your body releases all at the sweat it forgot to produce. in this unrealistic scenario, your body temperature would rise for 5 minutes and then rapidly cool, perhaps so much so that your skin would briefly feel cold.
A well-functioning body, sweating at a steady rate, is the equivalent of a smoothly declining ROR. On the other hand, the forgetful body that overheats and then rapidly cools is like the typical ROR curve that levels off or rises just before first crack, and then crashes after first crack begins.
First crack represents a release of moisture analogous to a human sweating. in the case at coffee roasting, it’s intuitively appealing to have all at the beans crack at the some moment, as that would imply the beans were all roasting at the same rate. However, in a roasting machine full at beans, it too many beans crack at the same time, their cumulative moisture release would cool the roasting system too much (resulting in the ROR crash) and slow or stall the roast.
It one intends to roast beyond the end of first crack, I recommend maintaining a steadily declining ROR to prevent a strong crack that cools the roasting environment too rapidly.
However, it a roaster plans to end a batch during first crack, it may be wise to enter first crack with more momentum, to attempt to make the beans crack almost simultaneously, and drop the batch before the roasting environment cools too much.
A medium roast with a smooth ROR and 20% DTR
A very light roast with high ROR entering first crack and low DTR
* I compiled and evaluated my roast data by using a pencil, calculator, and spreadsheet. These days one can analyze such data much more efficiently with the aid of computer software such as Cropster’s “Roast Ranger” application.
** The ROR’s tendency to accelerate around both cracks presumably indicates two exothermic phases.
*** I consider the beginning of first crack to be the moment the operator hears more than one or two isolated pops. Mastering Consistency
Much like the elusive “God shot” of espresso, most companies roast the occasional great batch but can’t seem to reproduce it consistently. Variations in a roaster’s thermal energy, green-coffee temperature and moisture, ambient conditions, and chimney cleanliness all collude to make roasting inconsistent. I’ve designed the tips in this chapter to help you control or lessen the impacts of these factors. Following these recommendations will help any roaster improve consistency.
How to Warm Up a Roaster
At a cupping of some lovely Cup of Excellence coffees a few years ago, I noticed that one of the samples was very underdeveloped and another was slightly underdeveloped. The other cups had varying degrees of good development. It dawned on me that those two cups had been brewed from, respectively, the first and second batches roasted that day. I suggested to my cupping host the order in which he had roasted the samples that morning. I had guessed the order correctly.
Every roaster I’ve ever asked has admitted to having difficulty with the quality of the first few batches of a roasting session. The problem is usually caused by inadequate warming up of the roasting machine. Most machine operators warm up a roaster to the charge temperature and then idle the machine at or near that temperature for some amount of time, usually 15-30 minutes, before charging the first batch. This protocol guarantees that the first batch will roast sluggishly compared with successive batches.
The problem is that temperature probes are poor indicators of a machine’s thermal energy. (See “Charge Temperature” in Chapter 9.) As a cold roasting machine warms up, although the temperature probes quickly indicate that the air in the machine has reached roasting-level temperatures, the mass of the machine is still much cooler than the air in the drum. If one charges a batch at this point, the machine’s mass will behave akin to a heat sink and absorb heat from the roasting process, decreasing the rate of heat transfer to the beans. After several roast batches, the machine’s thermal energy will reach an equilibrium range within which it will fluctuate for the remainder of the roasting session.
The trick to normalizing the results of the first few batches of a roasting session is to seemingly overheat the machine during the warm-up, before stabilizing it at normal roasting temperatures. To my knowledge, there is no practical, precise way to measure a roaster’s thermal energy. However, the operator can apply some informed experimentation to establish a protocol that brings a roaster’s thermal energy into its equilibrium range. The operator should employ this protocol prior to charging the first batch of every session.
I recommend the following procedure to determine an effective warm-up protocol for your roaster:
1. Set the airflow to the average level you will use during your roasts.
2. Using a medium-to-high gas setting, warm up the machine until the bean probe indicates 50°F (28°C) above your intended charge temperature.
3. Idle the machine at that temperature for 20 minutes. 4. Lower the gas setting so the temperature drops gradually. 5. Once the probe displays the charge temperature, idle the machine at that temperature for 10 minutes. 6. Charge the first batch. 7. Roast the first batch, using the same gas and airflow settings you would for a batch later in the day. 8. Compare this batch to the results you would typically get later in a roast session. If this batch roasted faster than desired, lower the peak warm-up temperature next time. If this batch was slow, idle at the peak warm-up temperature for a longer time. 9. Repeat step 8 each day, until your first batch behaves exactly as batches later in a roast session do.
Between-Batch Protocol
As important as the initial warm-up protocol is your between-batch protocol. One should follow an identical procedure after every batch to “reset” the roaster’s thermal energy at the desired level before charging the next batch.
I suggest the following as an effective template for a between-batch protocol. Feel free to adjust this procedure to meet your machine’s particular needs. I strongly suggest using a timer to ensure you make each adjustment at the same time, every time.
1. Decrease the airflow to the lowest level you will use during a roast batch.
2. Turn off the gas for 1 minute after dropping a roast batch. Adjust the gas to a setting that will bring the temperature probe to the intended charge temperature in 60-90 seconds. 3. Once the charge temperature is reached, idle there for 1 minute. 4. Charge the next batch.
The protocols for the initial warm-up and between batches are meant as guidelines to help one approach these transitions systematically. The operator will undoubtedly need to customize these protocols to achieve perfectly consistent batches. With some experimentation, these protocols should allow anyone to produce roasts that track their intended profiles almost identically every batch, with total roast times varying by no more than 5-10 seconds per batch.
  Что способствует осуществлению желаний? Стопроцентная, непоколебимая уверенность в своем...  Что делать, если нет взаимности? А теперь спустимся с небес на землю. Приземлились? Продолжаем разговор...  ЧТО ТАКОЕ УВЕРЕННОЕ ПОВЕДЕНИЕ В МЕЖЛИЧНОСТНЫХ ОТНОШЕНИЯХ? Исторически существует три основных модели различий, существующих между...  Конфликты в семейной жизни. Как это изменить? Редкий брак и взаимоотношения существуют без конфликтов и напряженности. Через это проходят все... Не нашли то, что искали? Воспользуйтесь поиском гугл на сайте:
|