|
|
Part 4: Combat And Wounds 17Стр 1 из 15Следующая ⇒ ZONA ALFA Salvage and Survival in the Exclusion Zone
Patrick Todoroff Osprey WARGAMES
Zona Alfa Salvage and Survival in the Exclusion Zone
Patrick Todoroff Contents
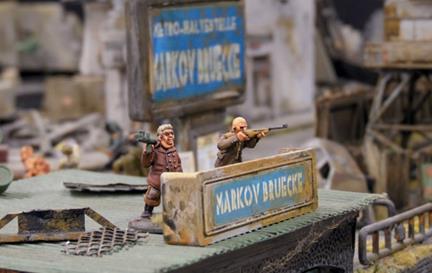
Part 1: Introduction 4 1.1 Intentions 4 1.2 Definitions 5 1.3 Essentials 7 Part 2: Vitals 9 2.1 Model Stats 9 2.2 Weapon Stats 9 Part 3: Core Mechanics 10 3.1 Initiative and Alternating Activation 10 3.2 Combat Experience 11 3.3 Actions 11 3.4 Complex Tasks and Skill Checks 13 3.5 Movement, Field of View, and Terrain 15 3.6 Cover: Obstructions, Soft Cover and Hard Cover 15 3.7 Squad Cohesion and Actions 16 Part 4: Combat And Wounds 17 4.1 Ranged Combat 17 4.2 Melee Combat 17 4.3 Combat Results: Miss, Deflected Hits and Successful Hits 20 4.4 Wounds, Pinned, Rally, and Med-Kits 21 Part 5: Armory, Body Armor, And Indirect Fire Weapons 24 5.1 The Armory 24 5.2 Terrain Features and Area Effect Weapons 26 5.3 Body Armor 26 5.4 Indirect Fire 27 Part 6: Skills And Abilities, Equipment And Equipment Slots 30 6.1 Skills and Abilities 30 6.2 Equipment and Equipment Slots 31 Part 7: Comrades On The Battlefield 33 7.1 Character Composition and Squad Creation 33 7.2 Factions 36 Part 8: Zone Runs, The Mission Area, And Post-Mission 38 8.1 Zone Runs 38 8.2 The Mission Area 39 8.3 Zone Hostiles 41 8.4 Salvage, Anomalies, Environmental Hazards 44 8.5 Post Mission: Advances and Battle Scars 46 8.6 Post Mission: The Stalls 51 Part 9: Linked Missions And End Goals 54 9.1 Linked Missions 54 9.2 End Goals: The 10,000 Ruble Plan and Other Retirement Options 56 Part 10: Introductory Zone Run – Red Gypsy 3 58 Game One: The Crossroads at Blyatsk 59 Game Two: Walk in the Chernya Woods 60 Game Three: The Ishikhov Shuffle 61 Aftermath 63 Part 11: The Last Bit 63 Welcome to The Zone
So, you decided to sneak past the Cordon, eh? Slip by the patrols and the towers, through the minefield, under the electric fence, to take your chances in the Exclusion Zone. Ah yes, the lure of adventure, riches, and fame... Well, good luck to you. To be brutally honest, you’re far more likely to find terror, dismemberment, and death – a quick death if you’re lucky. But everyone has to make a living, right? Besides, who am I to judge? I’m here, aren’t I? So, seeing as I can’t dissuade you, why don’t you cinch up your sack, grab your gear, and follow me. We’re on our way to investigate an Anomaly that appeared in a swamp fifteen kilometers from here. The Zone being what it is, we can always use an extra shooter. You have my word you’ll get a cut if we find any Artifacts. Just don’t say I didn’t warn you, eh? Part 1: Introduction
1.1 Intentions Privet, Bratok! Nice to meet you. Have a seat and let me explain a few things. At this advanced stage of my hobby-life, I meet plenty of people who enjoy gaming but don’t have the time to invest in large, painted armies, terrain, or learn a complex rule set. They want fast and fun games with a high coolness quotient, lots of adventure, a bit of competition, and an excuse to hang out and eat pizza with friends. Zona Alfa is my attempt to fill that bill. My first goal was to create a set of solid, straightforward wargame rules for 28mm tabletop skirmishes. I wanted a game that would allow anyone reasonably familiar with miniature wargaming to be able to stat out appropriate figures from their own collection, plunk down terrain, review the basics, and get started straight away. My second goal, as a long-time fan of the excellent S.T.A.L.K.E.R. and METRO 2033 fictional settings, was to make a game soaked in that decayed, post-apocalyptic Soviet aesthetic. What could be cooler than recruiting a few comrades, gearing up, and slipping into the Exclusion Zone hunting mutants and artifacts? Zona Alfa is the result. Nothing fancy or finicky, I want Zona Alfa to be rugged, reliable, and easy to use. Like an AK-47. Zona Alfa is usually played between two players on a 3’ x 3’ game area with each player controlling between 4–12 miniatures. Boards sized at 4’ x 4’ or 3’ x 4’ are fine too and will give each crew more room to maneuver. Our local gaming group has also run games with as many as six players on a 4’ x 6’ area with no appreciable down time. While designed with 28mm miniatures in mind, Zona Alfa also works in 15mm as well. Simply substitute measurements in inches for centimeters.
It’s All About The Story Number crunching with toy soldiers is not why I got into the hobby. Narrative games, that’s where it’s at for me. The long shot, the impossible save, the heroic last stand… I really enjoy it when dramatic scenes unfold on the table. With that focus and type of game in mind, I have streamlined the Zona Alfa game mechanics and simplified various details like weapons, body armor, and troop abilities. Those are
all divided into broad categories in order to keep the game flowing and give players the opportunity to deploy the widest possible range of figures. Specific weapons and gear are referenced for flavor, but if differentiating between an AK-47 and an AK-74 is your wargame thing, Zona Alfa might not be for you. However, if you’re willing to risk the Zone’s dangers for a chance at an early retirement in a dacha on the Black Sea, keep reading. Zona Alfa is not tied into to any specific game company or range of miniatures, therefore certain aesthetic elements like in-game hostiles are of the generic, mutated, post-apocalyptic kind. Feel free to use and substitute whatever figures you already have in your collection. There are guidelines later on for statting out different miniatures. 1.2 Definitions Like any specialty area of interest, wargames have their own jargon. Here are some terms and concepts you’ll need to know for Zona Alfa. WYSIWYG What You See Is What You Get. This means that models must be equipped according to actual, physical model. A t-shirt and cut-off shorts are not body armor. A pistol is not an assault rifle. There’s no sense in getting finicky over types of shotguns – but the miniature should be equipped with one. Zona Alfa has multiple troop types, armor, and weapon categories, along with variables like special abilities and equipment to accommodate and represent nearly any miniature out there. I trust players can identify their own figures accurately and assign them to the fair and appropriate categories.
LOS/LOF Line of Sight/Line of Fire. A model must be able to trace a line to its target in order to ‘attack’ it. If the model can ‘see’ any part of the enemy model, it can shoot it (of course, that means it can shoot back…). This is your excuse to finally buy that cool laser pointer you always wanted! The only exceptions to this LOS/LOF rule are Indirect Fire capable weapons like mortars or grenades. More on that later (see page 27). There’s only a few of us left. Mutants got Fat Boris and the new kid, Ignaty, last night. A pack of them crept up on us while we were setting up camp. © Lead Adventure Miniatures
Unit Zona Alfa is a skirmish game where players command a squad composed of individual models. Each model is a single soldier, and is termed a ‘unit’. However, there will be times in the game when a ‘unit’ is composed of multiple models. Typically, these are Zone Hostiles that function as a pack or swarm like Dogs, Rats, or Mutants. These multiple model units are always composed of similar troop types with similar stats, abilities, and equipment. Multiple model units must perform the same Action simultaneously, e.g. all Move, all Attack, all Check for Morale etc. Players might consider basing multiple models on one large base for ease of movement and track casualties with tokens. More on that later (see page 21).
D10 Abbreviation for a 10-sided die. Zona Alfa uses D10s. Four to six should be sufficient for each player. When the rules call for ‘3D10’ it means the player rolls three, ten- sided dice. A result of the base Target Number or less (+/- modifiers) is a Success. So, a high roll = bad. A low roll = good.
D6 Abbreviation for a 6-sided die. In Zona Alfa, D6 are used to determine results on the Zone Effects tables.
Stats/Modifiers To represent abilities on the battlefield, game models are assigned ‘Stats’, or numeric values corresponding to movement, attack, defense, and morale. There are two types of Stats: Model Stats and Weapon Stats (See Section 2, page 9). These Stats can be further modified by special in-game circumstances like terrain, special abilities, or equipment. 1.3 Essentials You and your comrades will need seven things to enter the Zone:
1. A flat surface of at least 3’ x 3’. For larger games with more players, use a 4’ x 4’ or 4’ x 6’ area. 2. Dice. Four D10s per player, and at least one D6 for the Zone Effects Tables. 3. A tape measure or ruler marked in inches (A cool laser pointer will come in handy too). 4. Battlefield Terrain: Appropriate terrain and scenic items to represent the dangerous sections of the Zone. The more, the better. There are dozens of excellent terrain companies out there. Model railroad trees and foliage work well too, are easy to find and inexpensive. For ruins and large buildings, our local game group is partial to Impudent Mortal’s MDF kits, and we use smaller plastic and resin scatter pieces from assorted companies. 5. Tokens and Templates: Tokens are an easy way to note a model’s in- game status. You can use paper chits, acrylic tokens, or glass beads. You will need tokens to mark Activated, Alert, Pinned, and Wounded states. For Templates, you will need a set of Blast and Flamethrower Templates (Large Blast Template is 5” diameter, Small Blast Template is 3” diameter, and the Flame Template is a 8” x 3” teardrop). These can be plastic or paper. We use an excellent set from Pyrkol. You also might want to get markers for the Zone Hot Spots, Mission Objectives, and Anomalies. These are always at specific locations on the table and we mark them with a small piece of Scatter Terrain, but we’ve found Litko tokens come in quite handy to distinguish that particular piece from the others on the battlefield. 6. A Turn Counter: Zona Alfa missions have a turn limit, so you’ll need to mark the countdown, whether that’s notations on paper, a die, or a nifty dial. 7. Miniatures: You’ll need figures for both Zone Crews and Zone Hostiles. For the Crews, dig through your collection and find 4–12 suitably-attired and equipped miniatures to represent your interests in the Exclusion Zone. Lead Adventure Miniatures offers an outstanding range of Soviet-flavored post- apocalyptic figures, but any Modern range works perfectly well. Take a look at The Assault Group, Eureka, Empress, and SASM for more inspiration. For Zone Hostiles, this is your excuse to purchase that mob of zombies you always wanted (or swarm of rats, pack of dogs, gang of bandits, horde of mutants… your call). Again, Lead Adventure Miniatures offers some excellent options, but feel free to use whatever you have to represent the Exclusion Zone’s dangerous inhabitants.
I arrived in the Zone last night with only my backpack and rifle. We nearly got nabbed by Military patrols twice, but the guide knew his business and got us away. © Lead Adventure Miniatures
Don’t Let Them Bother You
We get them from all over, these thugs and punks. They shove and strut like roosters. They think the Zone is just another territory to control, like the streets of Moscow or the docks at Vladivostok. Bah! As if the Zone cares about prison ink and Bratva connections... Flex that attitude here and she’ll kill you in the time it takes to sneer. You want to survive, you need four things above all else: a strong back, a stout heart, a keen eye, and quick feet. Everything else is for chickens to laugh at. Part 2: Vitals
In Zona Alfa, there are two types of Game Stats: Model Stats and Weapons Stats. Model Stats are for models (no surprise there). There Four Model Stats: Movement, Combat Ability, Armor, and Will. Every model/unit is assigned a numerical value in each of these four categories. These numbers reflect the model/ unit’s general proficiency and ability in battle. Weapon Stats are separate from Model Stats and pertain to the model/units specific armament. There are three Weapon Stats: Range, Firepower, and Damage. These values represent the weapon’s in-game effectiveness. Odd as it may seem at first, these are two separate stat-lines and sets of values because a highly trained Spetsnaz Veteran’s effectiveness in combat situations will vary depending on how he is armed. Does he have a combat knife, a Vityaz SMG, or an RPG 30R? Both types of Stats are explained below.
2.1 Model Stats • Movement: The distance in inches (“) a unit can move in one Action. The average human foot soldier moves 6”/Action. • Combat Ability: The unit’s proficiency with ranged and melee weapons. The average human trooper’s Combat Ability is a 5. •
• Will: The unit’s mental resolve, knowledge, and intelligence. A combination of morale and training. This is also the primary Stat for Skill Checks (see page 13). The average human soldier has a Will of 6. 2.2 Weapon Stats • Range: Given in inches, this is the weapon’s effective range under stressful, frantic, combat conditions. In general, the smaller the weapon, the shorter the range. An Assault Rifle has an in-game range of 36”.
We were moving in for a closer look when the sky turned black and it started bucketing down like the end of the world. We waited out the storm in the hut and when it was over, we came back out to find the anomaly was gone. © Lead Adventure Miniatures
•
• Damage: This represents the weapon’s stopping power or penetration. It is a negative modifier to Target’s Armor stat (Cuts through X layers of Armor). The heavier the caliber, the greater the Damage. A standard, modern assault rifle has a Damage rating of 1.
I’m out of food, down to half a canteen of water. Even worse, something big chased me last night and I lost my leg bag getting away. Only ammo is the magazine in my AK. © Lead Adventure Miniatures These two stat lines – Model and Weapon – are the foundation of Zona Alfa. They are intentionally broad so a gamer can generate reasonable values for a wide range of models, armor, and weapon types. See the Armory (page 24) and remember the WYSIWYG Rule! The details are explained further in, but here is a sample profile for a Crew Leader:
That’s it for now. Let’s move on to the Zona Alfa basic rules.
Part 3: Core Mechanics
3.1 Initiative and Alternating Activation At the start of every turn, players will each roll a D10 to determine that turn’s Initiative. This Initiative die roll result is modified (penalized) by the number of that player’s currently Pinned Units. The player with the highest result, after modifiers, activates first. The winner of the Initiative Roll may also pass that option to their opponent, if they deem it tactically advantageous. Players will then alternately activate one unit at a time, resolving all movement and combat, until every unit in both forces has Activated. No unit may be Activated more than once per turn. Once every available unit has Activated, the game turn ends and a new Initiative Roll is required. Each unit can Activate one time per game turn. When Activated, a unit can perform one, two, or three available Actions. The number of possible Actions is determined by the model’s Combat Experience. Combat Experience and available Actions are explained below. 3.2 Combat Experience (Soldatskaya smekalka – “Soldier’s tempering”) Many different kinds of people risk the Zone’s dangers. While all of them are a little crazy or at least desperate, only some of them have enough combat experience to function under pressure. In Zona Alfa, your squad mates perform according to their level of Combat Experience. There are three levels of Combat Experience – Rookie, Hardened, and Veteran – each with a corresponding ability to act in battle.
Rookie (Dukh translates as ‘ghost’ in Russian). Despite the dangers, there’s no shortage of newcomers in the Zone. Not the best, brightest, or most well-equipped, they are cheap to recruit. Rookies are capable of one Action per Activation. They start with no Skills and only one Equipment Slot.
Hardened (Kirza translates as ‘hard leather’ in Russian). These are the individuals who have survived the first couple months and stuck around. With a few missions under their belt and decent gear, they can hold their own in the Zone. Hardened squad mates are capable of two Actions per Activation. They have learned enough to acquire one Skill and have two Equipment Slots.
Veteran (Tyazheliy translates as ‘heavy one’ in Russian). Few and far between. Lean, quick, quiet, the stupidity burned off, these are the ones who have stared the Zone’s dangers in the face and lived to tell about it. Veterans are capable of three Actions per Activation. They have two Skills and three Equipment Slots. 3.3 Actions When Activated, a player will select any one of their units to perform various Actions. The amount of available Actions is determined by the level of Combat Experience. Actions can be performed in any order, as many times as possible. Below is the list of available Actions. With the exception of ‘Alert’, each of the Actions below counts as a single action in the normal rigors of a Zone mission.
Complex efforts such as defusing a bomb or repairing a generator generally require multiple Actions and have a related Skill Check.
Aim Use immediately prior to an Attack Action. Aim can be used for Ranged or Melee Combat. It adds a +1 bonus to model’s Combat Ability in the subsequent Attack Action and a +1 bonus to Weapon Damage if the attack was successful. An Aim Action can be used when firing into Melee, although the +1 bonus to the shooters’ Combat Ability and Weapon Damage is negated by frantic movement. However, the shooter is able to select their target and roll as normal without the possibility of hitting a friendly model/unit.
Alert (Special) At the cost of two Actions, a unit may hold One Action in reserve to interrupt an opponent’s Activation. This interruption can be any Action. For example, Move, Shoot, Aim, even Prep and Throw a Grenade etc.
Attack One Ranged or Melee attack: • Ranged Attack: Fire a ranged weapon one time at an enemy unit. Roll the number of Firepower dice appropriate to the particular weapon. • Melee Attack: One Melee Attack at one enemy model currently in base to base contact. Roll the correct number of Firepower dice assigned to the melee weapon.
Climb The model can scale any appropriate vertical surface more 1” tall, such as a building face or rock wall. Calculate the model/unit’s movement at half its regular Move stat (e.g. Climb 3” = 6” of Movement or one Action). This does not apply to stairs or ladders. These are traversed at model’s regular Move rate.
Inspect Similar to Aim, this Action is used when a model is in LOS and within 12” of a suspect location such as a Zone Hot Spot or Mission Objective. This Action allows the player to add or subtract 1 from the Zone Hostile Table roll for that particular location during this turn. This only applies if the Action is taken in the same turn prior to the crew engaging that location.
Jump Allows the model to jump a horizontal gap up to 2” wide for the cost of 1 Action. Jumping beyond 2” requires a Move Action prior and a Skill Check with the target number being the model/unit’s Will Stat.
Move Model/Unit moves up to its Movement Stat in inches. Movement does not have to be in a straight line and the model is not required to move the full amount. Model may move up or down a level in multi-level terrain via a slope, stairs, or ladder at their normal, unmodified, distance.
Prep and Throw a Grenade This counts as a single Action. Rules for Grenades and Molotov Cocktails are listed in the Armory in Section 5 (see page 24).
Remove one Pinned Counter from an earlier combat result. Removal is automatic at one Action per counter and does not require a Will check.
Recover Similar to Rally, this is essentially standing up and getting your bearings. In the event of a fall, an environmental or scenario specific event, the Model uses an Action to regain footing after being knocked prone.
Reload Reload Ranged Weapon. Certain ranged weapons or specific combat conditions, such as Unload, require a weapon to be reloaded after use. See the Armory in Section 5 for details (see page 24).
Use Item/Interact A catch-all Action that covers a variety of different events. This Action is used to Search a Terrain Item, Toss a Bolt at a Hot Spot, Apply a Med-Kit to an ally, Free a prisoner, Switch on a doomsday device… 3.4 Complex Tasks and Skill Checks While not related to Combat, Complex Tasks and Skill Checks add a dramatic element to Zona Alfa missions. These checks represent difficult or complicated situations that require the character to spend a number of Actions as well as utilizing their Will Stat. The specifics will be left to your imagination and the requirements of the scenario. Some examples of a Complex Task/Skill Check would be repairing a generator, defusing an IED, picking the hatch lock on a BTR-80, or hacking a computer terminal. Situations like these require a model to spend between one and three Actions, as well as make an initial one-time D10 Skill Check roll against the model’s Will stat. This Skill Check roll is a Free Action. To attempt a Complex Task, the model/unit must first be in base to base contact with the terrain item or model that represents the difficult task, be that a vehicle, a computer console, or a locked crate. Second, it must make a successful Skill Check to start the Task. This Skill Check is a single D10 roll made against the model’s Will stat and does not cost an Action. Complex Tasks have Difficulty Ratings. Most often this is 0 and the Skill Check roll is made at the model’s straight Will stat. However more complicated jobs might have a Difficulty Rating of 1, 2, or even 3. This value is a penalty to the model’s Will Stat, so defusing that IED (Difficulty 2) might require 2 Actions at -2 Skill Check. Bear in mind, special Gear and/or Skills will also modify Skill Check rolls. Again, the Skill Check roll is free and does not require an Action. Once a successful roll has been made, the model/unit may then expend actions to accomplish the task.
‘Savak says bring me this!’ ‘Savak says wait there!’ ‘Savak says stay away from here!’ Savak, Savak, Savak… Ugly little weasel. Who does he think he is, ordering me around? © Lead Adventure Miniatures
When Actions are spent on Complex Tasks, they do not have to be performed all at once and can be ‘banked’. Make a note on the model’s stat sheet or use chits to mark the number of Actions spent. While the Actions can be rolled over from turn to turn, they must be spent by the initiating model. Should that model move away from the task area, be injured or killed, a new unit may attempt the task, but it must start over and roll a successful Skill Check to start. Some Skill Checks may be restricted only to those models with specific Skills or Equipment. For example, mechanical repairs are much easier for a technician, while IED removal might be a bit less nerve-wracking for a demolition and ordinance expert. Regardless of how you want to play it in Zona Alfa, special abilities make characters better at certain Skills/Tasks than others. 3.5 Movement, Field of View, and Terrain Movement When performing a Move Action, movement is measured from the front of the model’s base and ends on the rear of the model’s base (Front to Rear). Yes, this adds the base width to the Move Action but it really cuts down on arguments. Movement does not have to be a straight line, neither is the unit required to use its full movement. A model can turn at any point during their movement and end facing any direction. I’m a big fan of movement gauges but, if necessary, using a length of string for complicated maneuvers can also do the job.
Field of View The Zone is a dangerous place that requires constant vigilance. All models are considered to have a 360-degree field of vision, regardless of the facing of the model.
Terrain Most terrain features are large scenic items that add atmosphere to the game. This includes hills, trees, buildings, foliage, walls, industrial equipment, storage containers, signage, and the like. These items block and/or affect model’s Movement, Line of Sight, and Line of Fire. “If you can see it, you can shoot it!” is the rule, so unless the model/unit is equipped with an Indirect Fire capable weapon, any terrain feature taller than the model blocks or prevents Ranged/Melee attacks, unless one party is at a higher elevation. Terrain features will affect a unit’s Movement and require the unit expend additional Actions and Movement to go around, through, or over it. 3.6 Cover: Obstructions, Soft Cover, and Hard Cover Terrain items shorter than a model’s height can be used to conceal or protect it by interrupting LOS/LOF or adding to model’s defense. If a terrain item partially covers a model from a specific angle, it may grant a Cover bonus to that model. To receive a Cover bonus, the Defending model must be in base to base contact with the terrain item, and in position to benefit from Cover in relation to the angle of attack. Cover falls into four broad categories: Obstructions, Soft, Hard, and Hardened.
• Obstructions are the first form of terrain modifier. They are any low terrain scenic that interrupts but does not totally block the Line of Sight/Line of Fire in the intervening span between the Attacker and the Defender. It’s not protecting them but it is partially blocking the shot. Obstructions give a -1 penalty per item to any Attacker’s Combat Ability. Obstructions are cumulative with each other and other types of Cover.
• Soft Cover items are wooden boxes, low bushes/scrub brush, a chain link fence, and the like. Soft Cover gives -1 penalty to Attacker’s Combat Ability and +1 bonus to Defender’s Will Stat. • Hard Cover items are brick walls, jersey barriers, dragons’ teeth (tank obstructions), and similar solid material. Hard Cover provides a -1 penalty to Attacker’s Combat Ability, a +1 to Defender’s Armor stat, and +2 bonus to Defender’s Will stat. • Hardened Cover is serious protection like that offered by concrete bunkers and sandbag weapon emplacements. Hardened Cover, when encountered, gives a -2 penalty to Attacker’s Combat Ability, a +2 to Defender’s Armor stat, and +3 to Defender’s Will stat.
The mutant hunter Raven is shooting at a Rad-Ghoul. There is a low hedge in the way (Obstruction) and the irradiated creature is crouching behind a stone wall (Hard Cover). Raven’s Ranged Attack suffers a combined -2 penalty (-1 for the Obstruction and -1 for the Stone Wall) while the Ghoul defender is granted a +1 Armor bonus and +2 to their Will check. If Raven’s Combat Ability is 6 and she is shooting an Assault Rifle, Raven would roll three D10s hoping for a 4 or less (Assault Rifle Firepower is 3). Each result of 4 or less would count as a Hit. Wolf and I were tracking a mutant pack down the Number 9 Highway near that village with the red water tower when we came across an abandoned BMP. © Lead Adventure Miniatures Elevated Attacks In case you needed another reason to take the high ground, any Ranged or Melee attack made from a higher elevation against a target in Cover reduces the Defender’s Cover level by one degree. This means Hard cover shifts to Soft, Soft cover shifts to Obstruction, and Obstruction modifiers are cancelled entirely when the Attacker is at a higher elevation than the Defender. 3.7 Squad Cohesion and Actions Zona Alfa is designed to be a skirmish game with players controlling a squad of individual soldiers, specialists, and characters. However, there may be an occasion where a “Unit” is composed of multiple models. In this case, the Squad Cohesion and Common Actions rules will apply.
Because the squad is trained to act as a team, they must stay together and engage in identical Actions when Activated. Squad Cohesion means models in a multi-model unit cannot be further than 1” from at least one other model within the unit. Think of this like a chain rather than a clump, so a skirmish line is fine. Common Actions require all models in the unit undertake the same Action together, e.g. to all Move, all Shoot, all Melee, etc. In addition, when attacking, all models concentrate their attacks on the same target.
A majority of the time, the only multiple model units are Zone Hostiles who act as a mob or a swarm like zombies or rats. Essentially, treat a multi-model unit as a single model with more Firepower and Wounds than a single model.
Part 4: Combat And Wounds
These are the two types of combat: Ranged and Melee.
4.1 Ranged Combat When engaging an opponent with a Ranged Attack, the attacker must have three things:
1. At least one Action to expend performing the attack. 2. Line of Sight to the Target model. 3. A weapon with sufficient range to reach the Target. Pre-measuring is allowed. If any part of the target unit’s base falls within the effective range of the attacker’s weapon, the attack is allowed. If not, there’s no shot or hit.
Attack Roll To perform a Ranged Attack, the Attacker declares they are expending the Action, identifies the intended Target, then checks the range and Cover modifiers (see page 15). They will then roll the appropriate number of Firepower Dice according to their weapon type (see the Armory, page 24). The target number for a Hit is the model’s Combat Ability, plus or minus any modifiers (Cover, Terrain, Aim, Special Gear etc). Any die rolls of the modified target number or less are a Hit.
Example Savak (aka the Weasel) is scavenging an old fire station deep in the Exclusion Zone when he spots a Bloodsucker. He fires his AK-74 at the mutant hoping for a bounty, or at least a few free drinks at the bar for taking out such a dangerous threat. The Weasel’s Combat Ability is 5. The Assault Rifle has a range of 36”, a Firepower of 3, and a Damage stat of 1. The Bloodsucker has an Armor stat of 3. An intervening split log fence counts as an Obstruction. Weasel would spend one Action to roll three dice, (weapon’s Firepower is 3) hoping for a result of 4 or less to Hit the mutant (5 for attacker’s Combat Ability, minus 1 for the Obstruction). Every result of 4 or less counts as a Hit, and for every Hit, the Bloodsucker must roll one D10, hoping for a result of 2 or less to deflect that Hit (Armor of 3, minus attacking weapon’s Damage of 1). Weasel brings his rifle up and pulls the trigger…
Turns out not everyone evacuated after the first Incident. They still call this place ‘home.’ © Lead Adventure Miniatures 4.2
Combat is considered simultaneous, the Defender does not have to expend Actions to fight back. In this simultaneous brawl, both the Attacker and Defender will roll the appropriate Firepower and Armor Save rolls at the same time for every round of Melee. Each player takes into account their model’s respective Combat Abilities, Special Abilities, weapon Firepower, Damage, and Armor ratings. Any die rolls of the modified target number or less are a Hit. Successful Hits are tallied and compared. The results are applied at the end of each round of Melee.
Hit and Parry At the end of each round of Melee, the number of the Successful hits by both Attacker and Defender is compared. The Attacker then has the option to use any of their Successful Hits to Parry (i.e. cancel) an equal number of the Defender’s Successful hits. Any remaining Hits are subject to Armor Saves and resolved as normal. So, depending on the dice results, this can allow the Attacker to avoid damage while inflicting it (It’s also entirely possible for the Attacker and the Defender to kill each other). The last model standing is the winner.
Example Savak the Weasel is having a bad day. Not only did he encounter a Bloodsucker, but he shot and missed. The Bloodsucker has charged him and now he’s up close and personal with one very angry, ugly, vicious mutant. Savak’s Combat Ability is a 5. Unfortunately, he does not have a melee weapon (see the Armory section, page 24) so he must use his AK-74 at a -2 penalty. On the other hand, the Bloodsucker has big claws and a Combat Ability of 6. It also has 2 attacks in Melee (FP 2). In the first round of melee, Savak would roll 3 dice and subtract 2 from each roll, hoping to get a 3 or less to hit (3 FP dice at Combat Ability 5, minus the non-Melee weapon Penalty). The Bloodsucker would roll 2 dice, trying to get a straight 6 or less. As the Attacker, the Bloodsucker would be able to spend any of its Successful Hits to Parry any of Weasel’s hits. Any leftover Hit results would be applied, with both players making appropriate Armor Save rolls. Make your peace with St. Strelok, Weasel! 
Time to visit Zakhar. He got a new shipment yesterday and rumor has it there was an RPG-7 in the lot. © Lead Adventure Miniatures
4.3 Combat Results: Miss, Deflected Hits and Successful Hits Melee Combat In the desperate and adrenaline fueled frenzy of Melee combat, only Misses and Successful Hits are counted. A Deflected Hit is considered as a Miss.
Ranged Combat While Ranged Attacks do not always damage the target, they may still affect it. There are three possible outcomes for Ranged Attacks: Successful Hit (A hit with a failed Armor Save), Deflected Hit (A hit with a successful Armor Save), and Miss. Successful Hits count as a Wound. These are Hits where a model’s Armor Save was unsuccessful. As most models only have one Wound, (except where noted. Bullets are not your friend) a Wounded model is considered a casualty and removed from play (or leave it laying there to display the carnage). In a round of Ranged Combat, Successful Hits are always resolved first. Use a token to mark models with multiple Wounds. Deflected Hits do not cause Wounds. These are Hits where the model’s Armor Save was successful. However, given the impact of high-caliber rounds on body armor, they have enough power to stun. To reflect this, for every round of Ranged Combat with a Deflected Hit, the Defender must take a Will check to determine if the shots unnerved them. The Defender rolls 1D10 against their Will stat for every round of Ranged Combat with Deflected Hits, (not the number of Hits!) taking into account any modifiers from Cover or special abilities. If the Defender fails the Will check, place a Pinned Counter beside the model. If the Defender passes the Will check, they carry on as normal (see page 22). Again, for every failed Will check from a round of Ranged Combat with Deflected Hits, place one Pinned Counter beside the Defender. Remember Pinned Counters are assigned according to each round of Ranged Combat. For Multi-Model Units and/or Multi-Wound Models, this Target Number is further modified by the number of Wounds/Casualties they have sustained. This number is a negative modifier to the Defender’s Will stat. A Miss causes no physical damage and does not affect the model.
Wounds Most units in Zona Alfa have one Wound, meaning all but the largest and most dangerous enemies can be taken out by a single clean shot or a solid hit. Now a Wounded, single Wound unit isn’t necessarily dead, but they are placed Out of Action. Place the figure face down on the table and mark them with an appropriate token or chit (a tiny plastic skull is suitably morbid). A model that has been Wounded and put Out of Action, but is not healed (see Med-Kits, page 22) before the end of the mission must roll on the Battle Scars Table when the mission is finished to determine the injury’s lasting effects (See Section 8.5, page 46). A one-Wound and Out of Action model that is Wounded again in a different round of combat while Out of Action is considered Permanently Dead. Any Equipment, Weapons, or Armor they have goes into their crew pool and can be used to equip other crew members or recruits.
Multiple Wound Models When starting a Zona Alfa game, only your Crew’s Leader – the model you selected to represent your interests in the Zone – starts with two Wounds. Other crew members can achieve this level of resilience with enough
When a Zone Crew Leader, or some other multi- Wound model, receives their first Wound, mark the model’s stat sheet or place an appropriate token by their base (An acrylic blood drop, a numbered chit, a colored bead are all good markers). The Wounded model remains in the game but functions at a reduced capacity, moving at half their normal Movement rate and fighting at half their normal Combat Ability (rounded up). Also, there is a -1 penalty to their Will stat. This ‘Two Wound Rule’ keeps named characters in the game without making them invincible.
At the Stalls, everything has a price. It’s like a farmer’s market, but with guns. © Lead Adventure Miniatures
Pinned and Rally In order to remove a Pinned Counter, the Pinned unit must expend one Action to Rally. One Rally Action removes One Pinned Counter. Removal is automatic and no die roll is required. The removal simply consumes time and energy. i.e. an Action. A unit cannot be burdened with more than four Pinned Counters. With the exception of defending itself in Melee Combat, a unit cannot perform any other Actions until all Pinned Counters are removed. A Pinned unit is eligible for Cover bonuses (being behind Soft or Hard cover) and receives an additional bonus to their Armor stat from all Direct Fire Ranged Attacks so long as they remain Pinned behind Cover (an additional +1 for Soft and +2 for Hard). The unit is considered to be hunkered down for protection, taking full advantage of the cover (They’re trying to crawl under their helmet!).
Models may have purchased Med-Kits before the battle. If self-administered, a model may use the Med-Kit as a Free Action that takes place immediately. The Wounded marker is removed, however the model gains 2 Pinned counters. It’s important to mention individual Med-Kits can only be applied to individual wounds. They will not work on a model hit and Wounded multiple times in the same round of combat. Now if a model receives two Wounds and has two Med-Kits, it may replace both Wounds with 4 Pinned Counters (2 for each Wound) but 2 is the maximum number of Wounds that can be dressed in a single round of Combat (Three and you’re Out of Action). If there are no Med-Kits available and/or the unit has been Wounded three or more times, mark it as Out of Action and place it face down (with that tiny skull beside it). It can no longer take part in the mission – unless it is Healed. An Out of Action model can be healed by an ally with a Med-Kit before the mission ends. Now this attention represents full medical attention and remedies all wounds, but the model cannot rejoin the action for the duration of that mission. If a Crew Leader (or Multiple Wound Unit) has a Med-Kit, they may use it to negate the effects of a Wound. Remove the Med-Kit from the unit’s inventory and replace the Wound marker with two Pinned Counters. No further penalties apply then. Wounds negated by Med-Kits are always replaced by two Pinned Counters (except for a model with the Bone Doc ability, see page 30). Applying a Med-Kit to an injured Allied model costs one Action and the medic must be in base-to-base contact with the injured model. A model applying a Med-Kit to itself is a ‘free Action’ and can be done at any time, such as after the Wounded model drags itself to the nearest Cover.
Example Zakhar “The Turk” has been running goods in and out of the Exclusion Zone longer than anyone can remember. He was one of the first to slip past the military cordon and has been here ever since. Tough as old leather, dour as a stone, rumor has it the Turk’s eyes have surveyed every square meter of the Zone’s terrible beauty, even inside the Sarcophagus itself. The old gas station where he trades has been known as “The Turk’s House” for years. If the Turk is ever wounded, his normal Combat Ability of 7, Move Rate of 6” and Will of 7, would be reduced. His Combat Ability would drop to 4 (half of 7, rounded up) his Movement to 3”, and his Will would be 6. The Turk would be in a tough spot. But then the Turk has been in plenty of tough spots over the years. That’s why he carries a modified Saiga-12 and an extra Med-Kit wherever he goes – even to the latrine. 
Ranged Attack Summary To conclude, every time a unit is targeted by a Ranged Attack, resolve Successful Hits/Wounds first. Next, roll Will checks for every round with Deflected Hits, placing Pinned Counters for Failed Checks. Misses are a waste of good ammunition. Aim better next time, comrade! • Ranged Attack Successful Hit = Wound or Casualty • Ranged Attack Deflected Hit = Possible Pinned Counter • Miss = Miss
Time To Kit Up?
You want reliable guns and gear, you need to see the Turk. AKs, Saigas, ammo, grenades, body armor, GLONASS satnav sets…Zakhar has everything and what he doesn’t have he can get. Even military kit, if you’ve got the Script. Go eleven kilometers on the Number Three East road. There’s an old petrol station at the top of the hill. That’s his trading post. When you come to the front gate, keep your weapon slung and your hands visible. The password is ‘Cheeki Breeki’. The place looks battered but don’t let that fool you; there’s a dozen guards, reinforced walls, and MON-50 mines sprinkled everywhere. That gas station has survived a hundred attacks. It’ll survive a hundred more. Zakhar won’t be cheap, but the gear he sells will work. And that’s what’s important. Part 5: Armory, Body Armor, And Indirect Fire Weapons
The Vladivostok crew is at it again. They’re slipping past the Cordon from the North, following the old gas pipe straight to the refinery in the Red Hills. © Lead Adventure Miniatures 5.1 Now we get to the crunchy part. Below is the Armory section. While Russian-flavored, Zona Alfa does not differentiate between types of Assault Rifles (AK74 vs Vintorez VSS) or handguns (Makarov vs Grach) and the like. The rules are not tied to a proprietary range of figures, so Weapon and Armor types are broad, catch-all categories to allow gamers to use their coolest miniatures. Remember the WYSIWYG Rule and stat out your models according to the closest appropriate Weapon/Armor type listed. Tweak Damage,
Notes before you continue: weapons marked ‘Melee’ can only be used in Melee combat (makes sense, right?). Certain ranged weapons such as Pistols, Sub-machineguns, and Shotguns can be also used in Melee with no penalty. Other ranged weapons such as assault rifles incur a -2 penalty to the attacker’s Combat Ability when used in close combat. Where the weapon calls for a “template” – be that a teardrop Flame, a Small Blast, or a Large Blast – the sizes and shapes referenced are commonly used in other game systems and are readily available (for sizes please see page 7). If you are partial to another, particular set of sizes, feel free to use them so long as they are used consistently.
Grenades and Explosives Crew members can carry up to two (2) grenades of any type for free. Grenades come in pairs and the first set does not use an Equipment Slot (see Section 6.2, page 31). Additional sets of Grenades do use an Equipment Slot. Grenade types can be mixed as desired. Track their use on a character’s Stat sheet. All Grenades and Explosives are capable of Indirect Fire (see page 27).
Weapon Special Rules Indirect Fire Weapon See Section 5.4, page 27.
One Action must be spent after each Shooting Attack to reload this weapon.
Limited Ammo Five (5) Rounds per Load-Out.
Support Weapon Due to weight and or awkward size, models equipped with one of these weapons have their Movement rate reduced by 1” per Action.
…at the bridge near the hospital outside the Dead City. I’ve never been this deep in the Red – Anomalies are everywhere. © Lead Adventure Miniatures Crew Served Crew Served weapons are stationary positions. No movement possible.
Flame Template Approximately 8” long and 3” at its widest point, and tear drop shaped. No Combat Ability roll is necessary to place a teardrop template. Simply place the te   Что делает отдел по эксплуатации и сопровождению ИС? Отвечает за сохранность данных (расписания копирования, копирование и пр.)...  Система охраняемых территорий в США Изучение особо охраняемых природных территорий(ООПТ) США представляет особый интерес по многим причинам...  ЧТО И КАК ПИСАЛИ О МОДЕ В ЖУРНАЛАХ НАЧАЛА XX ВЕКА Первый номер журнала «Аполлон» за 1909 г. начинался, по сути, с программного заявления редакции журнала...  Что будет с Землей, если ось ее сместится на 6666 км? Что будет с Землей? - задался я вопросом... Не нашли то, что искали? Воспользуйтесь поиском гугл на сайте:
|