|
|
Rookie (1K Each) 1 Action Per Activation
Hardened (2K Each) 2 Actions Per Activation
Veteran (3K Each) 3 Actions Per Activation
Factions The final thing you got to do before heading out is choose a Faction, because like it or not, you’ve got to pick a side. There are six Factions in the Exclusion Zone, and while you have to pay Faction Dues, membership has its benefits. Depending on your choice, you get a couple pieces of special Gear for your Crew as a ‘signing bonus’, discounts when buying certain items at The Stalls (see Section 8.6, page 51 for details), and find it easier to recruit certain skilled team members later in the game. The specifics depend on which one you join. The Factions and their benefits are explained below.
Military The Zone Enforcement Unit is tasked with containing the Zone and interdicting the flow of illegal Salvage and dangerous artifacts. Ironic as it’s the Military that secretly allows and assists in the flow of said items. Military Crews start with three free pieces of Equipment: two Red Dot Sights and one load of Hot Load Ammo. They get a 20% discount when purchasing new Weapons, and can recruit Rookies at 25% less of the normal price later in the game.
Scientists Affiliated with the government and several large private research agencies, the Scientist faction studies the Zone, hoping to understand – and control – its causes and effects. Although technically protected by the military’s Zone Enforcement Unit, they frequently hire teams to perform elemental research in dangerous areas, run errands, and provide security. Scientist crews start with a free Detector, one free Med-Kit, and one free Tool Kit. They receive a 25% discount when purchasing Med-Kits, Tool Kits, Gas Masks, and Binoculars at The Stalls, and can hire two Hardened recruits at 50% the normal price later in the game.
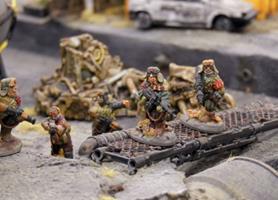
Salvage is everywhere in the Zone. So are enemies, traps, and environmental hazards. © Lead Adventure Miniatures Bandits Vultures, jackals, scavengers, vermin, maggots… the epithets are endless. These thugs rob, harass, and extort anyone and everyone they can. Some Bandits crews are street gangs seeking new turf, others are extensions of organized crime syndicates muscling in on the lucrative flow of goods in and out of the Zone. It’s all about money. Bandit crews start with two free doses of Electric Juice and a Chest Rig. They always receive one free Molotov Cocktail when visiting the Stalls. Later in the game, they can hire one Veteran recruit at 25% less the normal price and can always recruit at Rookies 50% normal price.
Independents
Cultists ‘If you find a kettle of crazy, it’s best not to stir it’. Well, the Zone is a whole cauldron of madness and there’s no shortage of folks willing to whip it to a boil. Cultists
Traders Someone has to grease the wheels of commerce and these are the guys who keep it all moving. Traders pass goods and information in and out of the Zone and among the various Factions. This makes them extremely useful, as well as a frequent target of Bandits. Because of this, Traders are always looking for reliable security. Traders do not receive any additional starting Gear. However, they receive a permanent 40% discount on all items at the Stalls and can hire Veteran recruits at a 25% discount.
Faction Dues To enjoy the benefits of your declared alliance, you must pay Faction Dues after each Zone Run, successful or not. 10% of the total value of all Salvage and artifacts is automatically deducted from the total. If no salvage is taken, the Faction deducts 10% from the crew’s current Zone Script reserve, including the amount in the 10,000 Ruble Retirement Fund.
Allies and Enemies So, you chose a Faction and have friends inside the Zone. Great that someone has your back. Problem is that means you have Enemies now too – someone who will stab you in the back, given half a chance. Relationships in the Zone come in three flavors: Allied, Neutral, Enemy. In Zona Alfa, anytime you encounter members of a different Faction, there are certain obligations, animosities, and unspoken agreements that come into play.
• Allied crews have made pledges of mutual assistance. These groups avoid attacking one another and concentrate on common enemies and common interests. Allied crews tend to cooperate on Zone Runs to eliminate any Zone Hostiles and split the Salvage. In order to break an alliance and attack an Allied crew, a Crew Leader must pass a one-time Will check at Difficulty 4 (Will Stat on a D10, subtract 4 from the roll result). This roll does not need to be declared to the other players, however it requires two Actions to make. If successful, the player may then act in whatever manner they deem expedient. If an attack is made, the two particular crews are classed as Enemies for the rest of the campaign. • Neutral doesn’t necessarily mean friendly. In a dangerous place like the Zone, “Live and let live” can be the order of the day. However, there are no obligations or understandings one way or another when facing a Neutral Crew, so Leaders can use approach the mission any way they want. • Enemy crews fight like junkyard dogs the moment they spot each other. Any time an Enemy Crew is in the mission area, Mission Objectives and Salvage become secondary and the destruction or rout of the Enemy is the team’s priority. All Objectives and Hot Spots are ignored. If a Crew Leader wants to override this antagonism, they must roll a one-time Will check at Difficulty 2
This is the end! © Lead Adventure Miniatures
(Will Stat on a D10, subtract 2 from the roll result). A Success means they can act normally for the rest of the game, otherwise, Mission Objectives and Hot Spots can only be pursued after the enemy Crew is dealt with.
Below is the table of alliances and grudges between the Zone Factions. Read the table rows left to right to determine your default reaction to members of a particular Faction. Notice the attitudes among the Factions aren’t necessarily reciprocal; groups have their own motivations for helping others, reasons that might not be mutual.
There you have it. Once you have created your Leader and Crew, kitted them out as best you can, signed on with a Faction, you’re ready to enter the Exclusion Zone. Ni Pukha, Ni Pyera, comrade! She Smiles, She Snarls
There are days I think the Zone is alive, as if it sees me, knows me. There was one run last winter where I swear something was leading me on. I ended up deep in the Red, but I didn’t care. There was this constant sense of being watched. Each step of the journey had tiny clues like breadcrumbs drawing me after. It was a bitter December, miserable cold. I almost bought it three times. But I made it back. That run was the biggest haul I’ve had, before or since. You have to stay sharp though. Keep your eyes peeled. The Zone is fickle; you can never be sure if the trail leads to a treasure – or a trap. Part 8: Zone Runs, The Mission Area, And Post-Mission
8.1 Zone Runs The Exclusion Zone: fame, fortune, and the high probability of mysterious and violent death packed into 2,600 square km. This is where you and your comrades are headed. There’s money to be made doing Zone Runs: salvaged gear is always worth some coin. Scientists will pay well for a mutant’s body parts, or for you to deliver messages, equipment, and data to and from their remote research stations. And those mysterious artifacts? One of those beauties could fetch a month’s wages. Or more. So chamber a round, take a swig of vodka, and off you go.
Now some people believe the Zone is more than a fixed geographic location, a place damaged by radiation and peppered with mysterious physical and temporal anomalies. These people insist the Zone is alive – a conscious awareness that seeks to expand and alter our entire world. Guess you’ll find out soon enough and come to your own conclusion. In Zona Alfa, the Zone is an active participant in the games, with beasts, mutants, and hostile creatures emerging during the mission. Some think these Zone Hostiles follow their own violent instincts, others maintain they’re like protective antibodies guarding a fragile system, or even servants sent to do the Zone’s will. Regardless of what you decide, I guarantee your Zone Run won’t be a walk in the sun.
Force Parity In terms of challenging but balanced games, I’m of the opinion most tabletop gamers are capable and fair-minded enough to create their own scenarios. As outlined in Section 6 (see page 30), Zone Salvage crews are built on Khrabrost’: the number of Actions per turn in each crew. Game-wise, in order to create a sense of parity between players, Zona Alfa uses the crew’s Khrabrost’ level as a guide to build crews for each mission. Both players decide on K value for the build, say 10, 12, or even 16, and set that as the limit for the scenario. All players who want to go on the Zone Run must then build Crews of various Combat Experience that are equal to or under that limit.
Example BUNKER RUN: a 9 K Game: Gennady Lukhov leads a force of three Hardened Zone hunters to investigate an isolated military bunker in the East side of the Zone. Three K for Gennady as Leader, plus Two K each for the crew makes 9 Available Actions per turn (3 + 6) Or 9 K. The Opposing Player could then field a force composed of their Leader (3K) plus Six Green recruits (1K Each) to get a total of 9K. Instead, they could bring their Leader along with 2 Hardened men and 2 Green newbies (3K + 4K + 2K). Any combination is acceptable so long as it does not exceed the agreed on 9K Limit. This method has been found to give players a definite force composition mechanic, reasonable guidelines, as well as a fair amount of flexibility to tailor unique crews with troops, the skills, and the equipment that fits their playing style. 8.2 The Mission Area Zone Threat Levels First and foremost, every section of the Exclusion Zone has been categorized by Threat Level (TL). The TL is a standing assessment of that area’s danger based on reconnaissance, scientific monitoring, and incident reports. It also reflects the type and quantity of potential Salvage, hostile creatures, and presence of anomalies. The Threat Levels are color-coded on all official Zone maps: Blue, Yellow, or Red, designated TL1, TL2, or TL3 respectively. Blue 1 Low Threat Levels are on the perimeter, Yellow 2 Medium TLs are a bit farther in, and Red 3 High Threat Level areas are found in the deepest parts of the Zone near the center. As a rule, the higher the Threat Level, the greater chance of locating valuable Salvage – and of encountering dangerous hostile forces and hazardous environments. Crew Leaders always choose which areas they explore, what jobs they take, what risks and rewards they are willing to face. A low TL equals low risk, but minimal
Salvage. If you want big money, it means you have to play big stakes. Just remember the Zone plays for keeps. Every mission will be walking the razor’s edge between staying alive and making a living.
 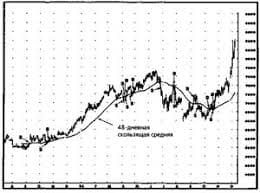 Что вызывает тренды на фондовых и товарных рынках Объяснение теории грузового поезда Первые 17 лет моих рыночных исследований сводились к попыткам вычислить, когда этот...  ЧТО ПРОИСХОДИТ, КОГДА МЫ ССОРИМСЯ Не понимая различий, существующих между мужчинами и женщинами, очень легко довести дело до ссоры...  Что делать, если нет взаимности? А теперь спустимся с небес на землю. Приземлились? Продолжаем разговор... 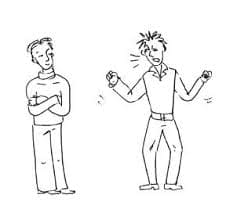 ЧТО ТАКОЕ УВЕРЕННОЕ ПОВЕДЕНИЕ В МЕЖЛИЧНОСТНЫХ ОТНОШЕНИЯХ? Исторически существует три основных модели различий, существующих между... Не нашли то, что искали? Воспользуйтесь поиском гугл на сайте:
|