
|
|
Keep flammable products or your hands away from the bulb while it is on, as it is hot. Do not touch the bulb until it cools down.4. 5. Reinstall the light unit assembly and head 6-43
U-343
For the headlight beam adjustment, be sure to proceed as follows (it is advisable to have a Yamaha dealer make this adjustment). 1. Horizontal adjustment: (Except for
adjusting screw clockwise To adjust the beam to the right, turn the screw counterclockwise. 2. Vertical adjustment: To raise the beam, turn the adjusting screw clockwise. To lower the beam, turn the screw counterclockwise. 6-44
1 Disc cover
4. Loosen the wheel axle holder nuts. 5. Remove the axle and the front wheel. EUU05400 NOTE: _____________________________ Do not depress the brake lever when the disc is off the caliper as the brake pads will be forced shut.
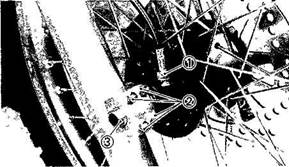
3 Remove the speedometer cable. J-234 Front wheel installation When installing the front wheel, reverse the removal procedure. Pay attention to the following points: 1. Make sure the wheel hub and the speedometer clutch assembly are installed with the projections meshed into the slots.
1 Speedometer cable 2 Axle holder nut 3 Wheel axle 6-45
2. Make sure the projecting portion (torque stopper) of the speedometer housing is positioned correctly.
3. Make sure the axle is properly torqued.
58 Nm (5.8 m.kg, 42 ft-lb)
4. 5. Tighten the axie holder nuts; first the up 6-46
Axle holder nut torque: 10 Nm (1.0 nvkg, 7.2 ft-lb)
Rear wheel removal EUU6620O AWARNIWG: It is advisable to have a Yamaha dealer service the rear wheel. 1. Cotter pin 2 Axle nut 3. Chain puller 3. Push the wheel forward and remove the drive chain.
1. Elevate the rear wheel by placing a suita 2. Remove the cotter pin from the axle nut 6-47 4. 5. The rear wheel assemble, the collar the EULT05500 NOTE: _____________________________ Do not depress the brake pedal when the disc is off the caliper as the brake pads wiil be forced shut.
Rear wheel installation When installing the rear wheel, reverse the removal procedure. Pay attention to the following points: 1. Adjust the drive chain. 2. Make sure the axle nut is properly toqued, U-647 \WARNING: Always use a new cotter pin on the axle nut. Axle nut torque: 90 Nm {9.0 m.kg, 65 ft-lb)
Troubleshooting Although Yamaha motorcycles receive a rigid inspection before shipment from the factory, trouble may occur during operation. Any problem in the fuel, compression, or ignition systems can cause poor starting and loss of power. The troubleshooting chart describes a quick, easy procedure for checking these systems. If your motorcycle requires any repair, bring it to a Yamaha dealer. The skilled technicians at a Yamaha dealer ship have the tools, experience, and know-how to properlyservice your motorcycle. Use only genuine Yamaha parts on your motorcycle. Imitations parts may look like Yamaha parts, but they are often inferior. Consequently, they have a shorter service life and can lead to expensive repair bills. 6-48 J-614 Troubleshooting chart U-663 iiWARNING:
Remove the fuel pipe and check fuel flow Fuel flow
No irregularity up to fuel cock
\ There is fuelh Turn the fuel cock to "OFF" [Fuel cock clogged
] Some fuel
Turn the fuel cock to "RES"
| Restart engine T Turn the fuel cock to "ON"
\ There is compression} —» {Compression normal |
Ask Yamaha dealer to inspect
Wipe clean with dry cloth Restart engine
CLEANING AND STORAGE K009 A. CLEANING Frequent thorough cleaning of your motorcycle will not only enhance its appearance but will improve its general performance and extend the useful life of many components. 1. Before cleaning the motorcycle: a. Block off the end of the exhaust pipe to b. Make sure the spark plug(s) and all filler 2. If the engine case is excessively greasy, 3. Rinse the dirt and degreaser off with a U 346 Excessive hose pressure may cause water seepage and contamination of wheel bearings, front forks, brakes and transmission seals. Many expensive repair bills have resulted from improper high pressure detergent applications such as those available in coin-operated car washers.
5. Rinse the motorcycle off immediately with 6. Dry the chain and lubricate it to prevent 7-1 7. Clean the seat with a vinyl upholstery 8. Automotive-type wax may be applied to K-010 B. STORAGE Long term storage (60 days or more) of your motorcycle wili require some preventive procedures to guard against deterioration. After thoroughly cleaning the motorcycle, prepare for storage as follows: 1. Drain the fuel tank, fuel lines, and carburetor float bowl(s).
2. Remove the empty fuel tank, pour a cup 3. Remove the spark plug(s), pour about one 4. Remove the drive chain. Thoroughly clean 5. Lubricate all control cables. 6. Block up the frame to raise both wheels 7. Tie a plastic bag over the exhaust pipe 7-2
If storing in a humid or salt-air atmosphere, coat all exposed metal surfaces with a light film of oil. Do not apply oil to any rubber parts or the seat cover. Remove the battery and charge it. Store it in a dry place and recharge it once a month. Do not store the battery in an excessively warm or cold place (less than 0°C{30°F) or more than 30°C(90°F)). U-058 NOTE: _____________________________ Make any necessary repairs before storing the motorcycle.   Живите по правилу: МАЛО ЛИ ЧТО НА СВЕТЕ СУЩЕСТВУЕТ? Я неслучайно подчеркиваю, что место в голове ограничено, а информации вокруг много, и что ваше право...  Что делать, если нет взаимности? А теперь спустимся с небес на землю. Приземлились? Продолжаем разговор...  Что вызывает тренды на фондовых и товарных рынках Объяснение теории грузового поезда Первые 17 лет моих рыночных исследований сводились к попыткам вычислить, когда этот...  ЧТО И КАК ПИСАЛИ О МОДЕ В ЖУРНАЛАХ НАЧАЛА XX ВЕКА Первый номер журнала «Аполлон» за 1909 г. начинался, по сути, с программного заявления редакции журнала... Не нашли то, что искали? Воспользуйтесь поиском гугл на сайте:
|
 Slip a new bulb into position and secure
 Headlight beam adjustment
 To adjust the beam to the left, turn the Front wheel removal


 Tightening torque:
 Before tightening the holder nuts, com


 EAJ36800
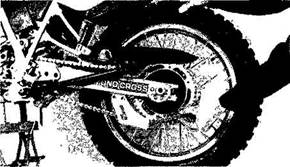
 Remove the axle nut.
 J-367
J-367


 Never check the fuel system while smoking or in the vicinity of an open flame.
 Water or dirt mixed in fuel
 Clean filter element and fuel tank


 Check if there is fuel in the fuel tank
 No fuel
 Supply fuel


 Kick the kick lever to see if there is compression


 3. Ignition
 Ask Yamaha dealer to inspect
 6-49
6-49 4 Once the majority of the dirt has been hosed off, wash all surfaces with warm water and mild, detergent-type soap. An old toothbrush or bottle brush is handy for hard-to-get-at places.