
|
|
Hard water or salt water is harmful to the engine. You may use distilled water if you can't get soft water.SUU0440O NOTE: ______________________________ If you find any leaks, ask a Yamaha dealer to inspect.
j. Reinstall the radiator cap. k. Run the engine several minutes to recheck the coolant level in the radiator. If it is low, add more coolant until it reaches the top of the radiator. I. Reinstall the stopper bolt, m. Full the reservoir tank with coolant up to "FULL" level. n. Reinstall the reservoir tank cap and check for coolant leakage. o. Reinstall the air scoop and side cover. H-642 Air filter 1. Remove the side cover. 6-14 2. Remove the air filter case fitting screws and the filter case cover.
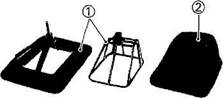
3. Side out the guide together with the element.
4. Remove the element from its guide, and clean it with solvent. After cleaning, remove the remaining solvent by squeezing the element. 6-15
6. When installing the element in its case, be sure its sealing surface matches the sealing surface of the case so there is no air leak. The element should be cleaned at the specified intervals. It should be cleaned more often if the motorcycle is operated in dusty or wet areas.
1 Guide 2 Element 5. Apply recommended oil to the entire surface of the filter and squeeze out the excess oil. The element should be wet but not dripping. U326 The engine should never be run without the air cleaner element; excessive piston and/or cyclinder wear may result.
Foam-air-filter oil or SAE 10W30 motor oil 6-16 H-9O0 Carburetor adjustment The carburetor is a vital part of the engine and requires very sophisticated adjustment. Most adjustments should be left to a Yamaha dealer who has the professional knowledge and experience to do so. However, the following point may be serviced by the owner as part of this routine maintenance. U-330 H-901 Idle speed adjustment 1. Start the engine and warm it up for a few 2. Set the idle to the specified engine speed
The carburetor was set at the Yamaha factory after many tests. If the settings are disturbed, poor engine performance and damage may result. 6-17 1 Throttle stop screw
NOTE: If the specified idie speed cannot be obtained by performing the above adjustment, consult a Yamaha dealer. The throttle cable should have a specified free play in the turning direction at the grip flange. If the play is incorrect, take the following steps for adjustment.
H903 Throttle cable adjustment U 064 NOTE: Before adjusting the throttle cable free play, the engine idling speed should be adjusted. 6-18 a 3-5 mm (0 12-0 20 in}
1. Loosen the lock nut. 2. Turn the adjuster in or out until the ad 3. Tighten the lock nut. H-203 Spark plug inspection The spark p!ug is an important engine component and is easy to inspect. The condition of the spark plug can indicate something of the condition of the engine. The ideal color on the white porcelain insulator around the center electrode is a medium to light tan color for a motorcycle that is being ridden normally. Do not attempt to diagnose any problems yourself. Instead, take the motorcycle to a Yamaha dealer. You should periodically remove and inspect the spark plugs because heat and deposits will cause the spark plugs to slowly break down and erode. If electrode erosion becomes excessive, or if carbon and other deposits are excessive, you should replace the spark plugs with a proper type of plug. 6-19
BR8ES {NGK) or BR9ES (NGK)
When installing the plug, always clean the gasket surface and use a new gasket. Wipe off any grime from the threads, and torque the spark plug properly.
20 Nm (2.0 m-kg, 14 ft-lb)
Spark plug gap. 0.7-0.8 mm (0.028- 0 031 in) U038 NOTE: _____________________________ if a torque wrench is not available when you are installing a spark plug, a good estimate of the correct torque is 1 /4 to 1 /2 turns past finger tight. Have the spark plug torqued to the correct value as soon as possible with a torque wrench.
1 Spark plug gap 6-20 H-801 Front brake adjustment The free play at the end of the front brake lever should be 2-5 mm (0.08-0.20 in).
1 Lock nut 2 Adjuster a 2-5 mm (0 08-0.20 m) 1. Loosen the lock nut. 2. Turn the adjuster so that the brake lever 3. After adjusting, tighten the lock nut.
AWARNING:   ЧТО ПРОИСХОДИТ ВО ВЗРОСЛОЙ ЖИЗНИ? Если вы все еще «неправильно» связаны с матерью, вы избегаете отделения и независимого взрослого существования...  Что делать, если нет взаимности? А теперь спустимся с небес на землю. Приземлились? Продолжаем разговор...  ЧТО ТАКОЕ УВЕРЕННОЕ ПОВЕДЕНИЕ В МЕЖЛИЧНОСТНЫХ ОТНОШЕНИЯХ? Исторически существует три основных модели различий, существующих между...  Что делает отдел по эксплуатации и сопровождению ИС? Отвечает за сохранность данных (расписания копирования, копирование и пр.)... Не нашли то, что искали? Воспользуйтесь поиском гугл на сайте:
|


 Recommended oil:

 Standard idle speed: 1,300-1,400 r/min
 (J-M5
(J-M5 Free p!ay: 3-5 mm {0.12-0.20 in)


 Before installing the spark plug, measure the electrode gap with a wire thickness gauge and adjust the gap to specification as necessary.
 Spark plug torque:


