|
|
Alkaloids: Caffeine and TrigonellineСтр 1 из 14Следующая ⇒ Acknowledgments
I’m grateful to several talented people for their help in creating this book. I would not have written a chapter on green coffee without Ryan Brown’s help. Ryan’s patient tutoring and vast knowledge of green coffee are responsible for most of the green-coffee information contained here.
Andy Schecter, Rich Nieto, Ian Levine, Mark Winick, Liz Clayton, and Vince Fedele provided valuable edits and feedback on the first draft. Eric Svendson and Henry Schwartzberg generously offered their expertise on thermocouples. Liz Clayton created this book’s lovely photos and contributed insightful editorial feedback. Janine Aniko converted my amateur drawings into professional graphics.
Rebecca Neimark is responsible for this book’s handsome design and layout. Jean Zimmer, my editor and coach, cleaned up my cliche-laden prose and again made me look like a better writer than I am. I can’t imagine publishing a book without those two.
James Marcotte’s brilliant roasting turned me into a coffee lover two decades ago and set a standard that few roasters have since met. Preface
Coffee roasting has always been something of a dark art. Although people have been roasting coffee for hundreds of years, little prescriptive or scientific writing about roasting exists. At best, roasters learn their trade by apprenticing under an experienced, competent roaster. More commonly, young roasters learn by trial and error, roasting and tasting countless batches, and develop a system based on folklore and spurious reasoning.
I spent the first ten years of my roasting career lost in the labyrinth of trial and error, and while I made some progress, it was usually of the “two steps forward, one step back” type. I desperately wanted a rational basis for my roasting beliefs, one that would prove itself in blind taste tests and apply to all beans and roasting machines.
After owning two roasting companies, I have had the good fortune to work as a consultant for many roasters. Through consulting I have had the opportunity to use many coffee-roasting machines and witness a variety of approaches to roasting and tasting. As part of my consulting work, I have often spent long hours analyzing roast data, trying to help my clients quantify their best practices. About six years ago I began to notice that the data of the rare, extraordinary batches all shared certain patterns, regardless of the bean or machine. I’ve spent the past six years testing and refining those patterns; they form the foundation of the system I present in this book.
I don’t claim to have all, or even most, of the answers. Despite my ignorance, I offer the ideas in this book to begin a long-overdue conversation about how to systematically roast coffee. Merely claiming that coffee roasting should be subjected to a systematic, objective, evidence-based approach is sure to offend some coffee professionals. Many roasters believe their special “feel” for roasting makes their coffee great. However, as recent technological advances have improved our ability to measure roast development and consistency, those “intuitive” roasters’ results have usually been found lacking.
With the introduction of data-logging software and the coffee refractometer, roasters have powerful new tools to track and measure results, making the process more predictable and consistent. I confess I miss the romance of making countless manual adjustments during a roast, furiously scribbling notes in a logbook, and running back and forth between the machine and logbook fifty times per batch. Watching a roast profile’s progress on a computer screen lacks the Visceral satisfaction of the old methods. I don’t roast for my own entertainment, however; I roast to give my customers the best-tasting coffee I can. On the rare occasion when I allow myself to sit quietly and enjoy a coffee, I’m grateful for the results. Introduction
This book is meant to be a reference for any roaster, whether a beginner or a professional. For our purposes, I will focus on light -to- medium roasting of specialty coffee processed in a batch drum roaster in 8-16 minutes. Most of what I will discuss also applies to continuous roasters, high-yield roasters, fluid-bed roasters, and other roasting technologies. However, I will not often refer to suchroasting machines directly.
I implore the reader to study this entire book and not focus solely on the “how to” chapters. Experience with my previous books has taught me that readers who cherry-pick the parts that appeal to them end up missing some of the big picture, leading them to misapply some recommendations. I’ve italicized potentially unfamiliar terms throughout the text and defined them in the glossary at the end of the book. Why We Roast Coffee Beans
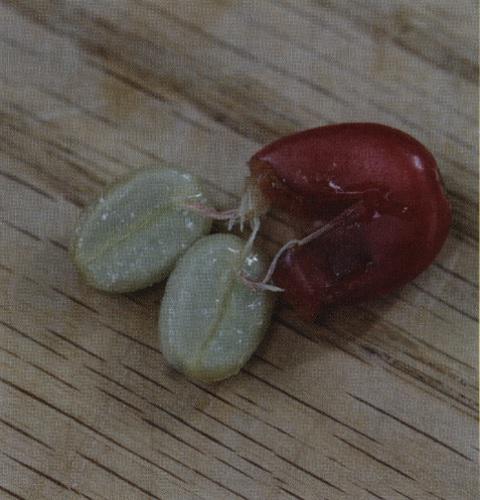
Coffee beans are the seeds of the cherries of the coffee tree. Each cherry typically contains two beans whose flat sides face each other. When steeped in hot water, raw, or “green,” coffee beans offer little in the way of what one might relate to as coffee taste and aroma.
Roasting green coffee creates myriad chemical changes, the production and breakdown of thousands of compounds, and, the roaster hopes, the development of beautiful flavors when the beans are ground and steeped in hot water. Among its many effects, roasting causes beans to
Change in color from green to yellow to tan to brown to black.
Nearly double in size.
The goal of roasting is to optimize the flavors of coffee’s soluble chemistry. Dissolved solids make up brewed coffee’s taste, while dissolved volatile aromatic compounds and oils are responsible for aroma.20 Dissolved solids, oils, and suspended particles, primarily fragments of bean cellulose, create coffee’s body. 20
It's important to pick coffee cherries when ripe to maximize sweetness and acidity.
Coffee beans covered in mucilage from inside the cherry. Green-Coffee Chemistry
Raw coffee beans are dense, green seeds consisting of about one-half carbohydrate in various forms and one-half a mixture of water, proteins, lipids, acids, and alkaloids. Roasters do not need to know much about green coffee’s chemistry to roast delicious coffee, but I offer the following summary to familiarize readers with the primary components of green coffee.
Structure
A raw coffee bean’s structure is a three-dimensional cellulose, or polysaccharide, matrix containing approximately a million cells.10 Coating the cellulose strands within that matrix are hundreds of chemicals that the roasting process will transform into the oils and soluble material that determine brewed coffee’s flavor. Green coffee’s cellulose structure contributes half of its dry weight.5 The cellulose contributes little to coffee flavor but does trap some volatile compounds, which are responsible for aroma, and adds to brewed coffee’s viscosity, increasing its perceived body.5
Sugars
Sugars, dominated by sucrose, make up 6%-9% of a green bean’s dry weight* and provide sweetness in the cup. Sucrose also contributes to development of acidity, as the caramelization of sucrose during roasting yields acetic acid.2
Lipids
Lipids, primarily triglycerides, make up approximately 16% of green coffee’s dry weight.5 Although lipids are not water soluble, brewed coffee contains some, especially when the brewing method uses either no filtration (e.g., cupping) or a very porous filter (e.g., espresso, French press, or metal- or cloth-filter drip). Lipids in brewed coffee help retain aroma and contribute to coffee’s mouthfeel. Higher lipid content is generally associated with better green-coffee quality.3
Unfortunately, lipids also present challenges to quality, as they are vulnerable to oxidation and rancidity during storage of roasted beans.
Proteins
Proteins and free amino acids make up 10%-13% of green coffee by dry weight.3 Amino acids and reducing sugars in coffee beans interact during roasting in nonenzymatic browning reactions knownas Maillard reactions. These reactions produce glycosylamines and melanoidins18 that contribute to coffee’s bittersweet flavor, brown color, and roasted, meaty, and baked aromas. Moisture Content
Ideally, water should account for 10.5%-11.5% of green-coffee weight. If moisture content is too low, bean color is typically faded and the cup has notes of hay and straw. A roaster must apply heat cautiously to low-moisture beans, as they are likely to roast too fast. If moisture content is much higher than 12%, green coffee is prone to developing mold and may taste grassy in the cup. Water slows heat transfer within beans,8 and it requires extra heat input to evaporate. Roasting very moist beans therefore requires extra energy in some combination of added time and roasting power.
Organic Acids
Organic acids, primarily chlorogenic acids (CGAs), constitute approximately 7%-10% of greencoffee’s dry mass. CGAs contribute to coffee’s acidity, sourness, astringency, and bitterness. Robusta coffee’s higher CGA content is likely responsible for its significantly greater bitterness. For both the coffee bean and the coffee drinker, CGAs offer antioxidant benefits.38 Other organic acids in coffee include citric, quinic, caffeic, malic, acetic, and formic.
Gases and Aromatics
Volatile aromatic compounds provide coffee’s aroma. Green coffee contains more than 200 volatiles but offers little aroma. Roasting creates the vast majority of coffee’s aromatic compounds, and so far, researchers have identified over 800 volatiles in roasted coffee.8
* Data on green-coffee composition refers to the genus Coffea species arabica only. The chemical compositions of Coffea robusta and other species of coffee differ, sometimes significantly, from that of arabica. Primary Processing Methods
Washed, natural, and pulped natural are the three primary processing methods of specialty coffee.
Wet/Washed
The Washed, or wet, process consists of the following steps:
1. Pulping of the cherry to remove the skin.
2. Removal of the sticky mucilage layer by fermentation or mechanical means. 3. Washing of the beans to remove loosened mucilage. 4. Drying of the beans in parchment, either mechanically for 1-2 days or in the sun for 3-16 days.
Dry/Natural
The natural, or dry, process consists of partially or completely drying the coffee cherries on the tree and then husking the cherries to remove their skins. Alternatively, the cherries are picked when ripe and then dried before husking.
Pulped/Natural
In the pulped/natural process, the cherries are pulped to remove their skin and set to dry with the mucilage layer intact. This method delivers a sweeter, cleaner cup than does the traditional natural process.
Washed processing produces cleaner, more acidic, more consistent, and generally more-prized coffee than natural processing does. Washed coffees also tend to be denser and require more aggressive roasting. The dry process can take several weeks and yields coffee with less acidity, more body, and earthier flavors than washed coffee. Arid growing areas often use the natural process because it requires much less water than the washed process. Natural-processed coffees burn more easily during roasting, so one should use lower charge temperatures and gas settings when roasting those beans.
Green Coffee Storage Until recent years, all coffee was packaged in burlap (jute) sacks and shipped in containers, arriving at roasters months after the coffee was processed. Roasters and importers frequently had the experience of cupping a coffee at origin, and perhaps cupping and approving a “pre-shipment sample,” only to receive coffee ruined by exposure to poor atmospheric conditions in storage or in transit.
In the past ten years, several small, quality-driven roasters have spearheaded a revolution in green-coffee packaging and transport. Many roasting companies, even some of the smallest ones, now buy coffee directly from farmers, share cupping and green-grading information with the farmers, and demand speedy delivery of coffee in packaging designed to preserve its freshness and quality. Such packaging is costly but justified, given the ever-increasing premiums paid for specialty coffees.
The following is a survey of the more prominent packaging options:
Burlap (jute) bags are the most common and economical option for packaging and transporting greencoffee. Jute is a renewable resource, and the bags are cheap; their use requires no special skills or equipment beyond those that are standard at any dry mill or exporting operation. Burlap sacks do not protect coffee from moisture or odors, however, so the coffee is vulnerable to damage during transport and storage.
Burlap bags are the most economical option for packaging and transporting green coffee.
Both vacuum-sealed bags (left photo) and GrainPro bags (right photo) protect beans from moisture and odors.
Vacuum sealing is the best available packaging for green coffee. Vacuum-sealed bags protect beansfrom moisture, odors, and oxygen, dramatically slowing the respiration, and therefore the aging, of green coffee. Before vacuum sealing, care must be taken to measure beans’ water activity to prevent development of mold during storage. Vacuum packaging costs approximately USD 0.15-0.25 per pound (EUR 0.45-0.75 per kilogram), requires special equipment and skill to implement, and often delays shipment of green coffee, so it is not without its costs and risks.
GrainPro and other hermetically sealed bags protect coffee against moisture and odors and arecheaper and easier to use than vacuum packaging. GrainPro bags preserve coffee significantly longer than burlap sacks but perhaps half as long as vac-sealed bags do. At a cost of about USD 0.05-0.10 per pound (EUR 0.15-0.30 per kilogram), GrainPro bags are often the best and most practical option for quality-conscious roasters. As with vacuum sealing, to prevent development of mold and other microorganisms during storage, it is important to measure beans’ water activity before packaging them in GrainPro bags.
Freezing —that is, storing green coffee in vacuum-sealed bags at a temperature below 32°F (0°C)—preserves flavor almost perfectly for years. Some roasters freeze special lots of beans and offer them as “vintage” coffees years after harvest, but there is not much consumer demand for such coffees at the moment. While it’s impressive to experience five-year-old beans that taste as good as last month’s crop, freezing is expensive and, arguably, wasteful. Freezing is an alternative worth considering in hot climates, however, as storage in extreme heat for a few days will ruin most green coffees.
Regardless of the packaging type she chooses, a roaster should take steps to ensure that her warehouse provides stable storage conditions all year round. Excessively warm or humid conditions; storing beans high off the ground, where the temperature may be hotter than realized; and storing beans too close to a hot roasting machine can all degrade green-coffee quality.
Seasonality
In recent years, roasters have emphasized offering only coffees that are “in season.” Like much else in the coffee industry, there is no consensus definition of seasonality. Some consider a coffee to be seasonal if it is from the most recent harvest, While others define seasonality based on an arbitrary amount of time elapsed since harvest.
I offer a definition of seasonality in the words of my friend Ryan Brown, an expert green buyer: “We care about seasonality because we care about cup quality. A coffee should be considered seasonal so long as the cup is vibrant, shows structured acidity, and is free of any signs of ‘age’ (such as paperiness, ‘bagginess,’ dryness, loss of organic material, etc.). It doesn’t need to be any more complicated than that.” Color Changes
The first stage of roasting is commonly known as the “drying phase,” although beans lose moisture at similar rates throughout most of the roasting process. During the first few minutes of roasting, degradation of chlorophyll causes beans to change color from green to yellow. As roasting progresses, the beans change from yellow to tan to light brown, primarily due to Maillard reactions. Late in a roast, as the beans approach first crack, the brown color deepens due to caramelization. In a dark roast, carbonization may turn beans black.
Cinnamon
Cinnamon *roastsare generally dropped, that is, discharged from the roaster, sometime very early infirst crack. Few consumers desire the green, grassy, often “peanutty” flavors of a cinnamon roast. However, some larger companies selling beans to cost-conscious consumers favor the very low weight loss of cinnamon roasts. In the cup: Very acidic, often “green” or “peanutty,” with grassy and floral aromas and very light body.
Left: Cinnamon roast, Right: City roast
City
City roasts are those dropped during the last stages of, or just after, first crack. Such roasts producelight-bodied coffee with very high acidity. City roasts are the current fashion among more progressive, or third-wave**, roasters and have historically been the standard in Nordic countries.
In the cup: Acidic, winey, sweet (especially if developed well), and juicy, with floral and fruity aromatics, hints of caramel, and light body. Can be grassy, lemony, and tart if not developed adequately.
Full City
Roasts discharged just before second crack and the appearance of surface oils are known as full city roasts. Many consumers prefer full city roasts because they offer a pleasing balance of moderate acidity, mellow caramels, and medium body.
In the cup: Caramelly, with ripe fruit and medium body.
Left: Full city roast, Right: Viennese roast
Viennese
Viennese roasts are those dropped in the early moments of second crack, when oil has just begun tomigrate to bean surfaces. The standard roast degree offered by Starbucks Corporation is an example of a darker Viennese roast.***
In the cup: Bittersweet, caramelly, pungent, and often nutty or spicy, with heavy, syrupy body.
Left: French roast, Right: Italian roast French
French roast indicates oily beans with pungent, bittersweet, and carbonized flavors. Such a dark roast makes it difficult to detect a bean’s unique character.
In the cup: Burnt, bitter, and smoky, with hints of caramel; body may be heavy or medium, as body peaks at a lighter French roast and declines with further roasting.
Italian
Most Italian roasters drop their coffees at medium roasts, but somehow the darkest, oiliest, and most bitter and carbonized roast level has come to be known as Italian roast. Almost all Italian roasts are rancid by the time they are consumed because their degraded cellulose structures allow rapid oxidation and staling.
In the cup: Burnt, smoky, rancid, and carbonized, with medium body.
Structural Changes
The microstructure of green coffee is relatively organized and dense, with oils coating the cellulose matrix.10 As coffee roasts, the generation of steam and carbon dioxide (CO2) increases pressure within the beans, forcing their structure to expand and pores to enlarge. A couple of minutes before first crack, beans expand enough to begin freeing the silver-colored skin, or chaff, trapped within the folds of their center cracks. When the cellulose can stretch no farther, fissures form within beans and on their surfaces, violently expelling water vapor and gases, creating the popping noises of first crack.
Specialty roasters seeking a light or medium roast typically drop beans between the end of first crack and the beginning of second crack. After first crack, gas production continues, rebuilding pressure within the bean cells. Simultaneously, the bean structure becomes more brittle, setting the stage for second crack. While the primary cause of first crack is the buildup of steam pressure, accumulation of CO2 is the main driver of second crack. Just before or after the onset of second crack, oils bleed to the bean surfaces; almost all roasters would regard this as an objective indicator of a dark roast.
Beans dropped during second crack. Note the surface oils and fissures.
Inner-Bean Development
Bean expansion and the release of water vapor and gases during the cracking phases weaken beans’ cellulose structures and make them more porous and brittle. The darker, more porous, and more brittle the inner beans are, the more developed they are. Sufficient inner-bean development is a prerequisite for great grind quality, high extraction, and elimination of undesirable savory flavors.
Inner-bean development lags behind outer-bean development during roasting. A roaster must skillfully manage the process to ensure that the inner bean is sufficiently roasted by the time the outer bean reaches its intended color. Ideally, the final “spread,” or color difference, between the inner and outer bean should be negligible in a light roast. The darker the roast, the larger the acceptable spread, provided the inner bean has developed to a certain minimum degree. Throughout this book, I will discuss strategies to optimize inner-bean development.
Roasting Chemistry
To a coffee lover, the roasting process is nothing short of magic: Dense, dull-tasting green beans morph into ambrosial brown beans that release an intoxicating fragrance. During roasting, countless reactions, including Maillard reactions and caramelization, brown the beans and create hundreds of new taste and aroma compounds. The roasting process also conveniently makes the beans brittle enough to grind easily and porous enough to allow water to access and extract their soluble flavors.
Aroma Development
The development of desirable aroma doesn’t begin in earnest until several minutes into the roasting process. Rapid development of volatile aromatic compounds occurs at around the time bean moisture drops below 5%.8 Caramelization and Maillard reactions, as well as degradation of amino acids, sugars, phenolic acids, and lipids, contribute to the development of aromatics.8 Caramelization yields fruity, caramelly, nutty, and other aromas, while Maillard reactions produce savory, floral, chocolaty, earthy, and roasted aromas, among others.
The oils in coffee dissolve much of its volatile aromatic compounds and slowly release them as aroma during and after brewing.8 Aroma content peaks at a light to medium roast. With further roasting, aroma destruction outpaces its creation, and aromatics become smokier and more pungent. Roasted beans gradually lose aroma during storage through outgassing. Darker roasts, with their weaker and more porous cellulose structures, lose aromatics more quickly than lighter roasts do. Heat Transfer and Moisture
Both humidity in the roasting environment and moisture within beans influence heat transfer during roasting. After an initial lag, humidity in the roasting air increases the efficiency of heat transfer and causes faster moisture loss from the beans.8 Moisture content within beans has a more complex influence on roasting. Greater moisture content has three major effects on heat transfer within a bean:
It increases heat transfer because moisture increases a bean’s thermal conductivity.
It increases a bean’s specific heat capacity, meaning that the bean requires more heat energy to raise its temperature by a given amount.
The net effect is that temperature rises more slowly in moister beans than in drier beans.8 Therefore, machine operators should apply heat more aggressively when roasting moister beans and more judiciously when roasting drier beans.**
* Very fast (2-3 minutes) roasts, such as those often used in laboratory experiments, may show significantly higher temperature gradients. Roast time and peak ∆T are negatively correlated; as the value of one increases, the value of the other decreases.
** I learned this lesson the hard way during my first winter as a roaster. My green coffee had lost much moisture during storage in that season’s cold, dry air, and I found my coffees roasting too quickly. At first I didn’t know why the beans were roasting so fast, but I learned to use less heat in my roasts that winter. The next autumn I installed a humidifier in the roastery and maintained constant temperature and humidity levels all year to stabilize the green coffee’s moisture content. Roasting Machine Designs
A coffee-roasting machine is a specialized oven that transfers heat to coffee beans in a stream of hot gas while continually mixing the beans to ensure they roast evenly. Several types of roasters are in use today in the specialty coffee industry: classic drum roasters, indirectly heated drum roasters, fluid-bed roasters, recirculation roasters, and several others. Recirculation roasters return a portion of the exhaust air to the burner chamber to assist in heat generation for roasting. I will use the term “single-pass” to refer to machines that do not recirculate exhaust air. Each roaster design has distinct advantages and disadvantages, though no new design has eclipsed the popularity of the classic drum roaster, the design of which has not changed much in the past century.
Classic Drum
A classic drum roaster consists of a solid, rotating, cylindrical steel or iron drum laid horizontally on its axis, with an open flame below the drum. The flame heats both the drum and the air to be drawn through the drum. A fan draws hot gases from the burner chamber through the rotating beans and exhausts the smoke, steam, and various by-products of roasting and combustion out of the building through a vertical pipe, or “stack.” The drum’s rotation mixes the beans while they absorb heat by conduction from direct contact with the hot drum and convection from the air flowing through the drum.
At the completion of a roast, the machine operator opens the door to the drum, dumping the beans into the cooling bin, which stirs the beans while a powerful fan draws room-temperature air through the bean pile to cool it rapidly.
The best classic drum roasters have a double drum of two concentric layers of metal separated by a gap several millimeters wide. In a double drum, direct contact with the flame heats the outer drum, while the inner drum remains cooler. A double drum decreases conductive heat transfer and limits the risk of tipping, scorching, and facing. (Henceforth, these three are referred to in this text as “bean-surface burning”) If you buy a classic drum roaster, I strongly suggest finding one that has a double drum.
Advantages: The single pass of the roasting gas provides a clean roasting environment, and the drum serves as an effective heat-storage system, providing conductive heat transfer, especially during the first few minutes of a batch.
Disadvantage: Overheating the drum metal can easily lead to bean-surface burning.
Classic drum roaster. Beans (brown arrows) enter the roasting drum (1) through the loading tunnel
(2). After roasting, the beans cool in the cooling bin (3). Air (blue arrows) passes from the combustion chamber (4) through the roasting drum and exhausts through the chimney (5) by way of the cyclone (6), which traps chaff.
Single drum (left) and double drum (right)
Probat UG
To decrease costs, some manufacturers have abandoned the double drum and substituted a static plate, or "heat shield,” between the flame and drum. Despite these manufacturers’ claims, single-layer drums with heat shields are usually interior to double drums. The problem is that the heat shield gets extraordinarily hot because it is stationary and in constant contact with the flame (A double drum’s rotation prevents any one area from overheating due to continual contact with the flame.) I measured one heat shield at 950°F (510°C) with an infrared thermometer during a typical roast. The heat shield interferes with the machine operator's control at a roast by radiating large quantities of heat even when the flame is off.
Indirectly Heated Drum
Machines with indirectly heated drums send hot air from a combustion chamber through the roasting drum. This design protects the drum from direct flame contact, allowing the machine operator to use higher roasting temperatures with less risk of bean-surface burning. Like classic drum roasters, indirectly heated drum roasters mix the beans in the drum for even roasting and dump the beans into a separate cooling bin for efficient cooling at the end of a roast.
Advantages: Indirectly heated drums provide a clean roasting environment and permit faster roasting at higher temperatures, with less risk of bean-surface burning, than most drum-roaster designs.
Disadvantage: This design is a little less fuel efficient than the classic drum roaster.
Indirectly Heated Drum Roaster
This Jasper has an indirectly heated drum.
Fluid-Bed
Fluid-bed roasters rely on high airflow to keep the beans aloft and rotating in the roasting chamber. Because beans lose density as they roast, to maintain proper bean rotation these machines require very high airflow early in a roast and declining amounts of airflow as a batch progresses.16
Most fluid-bed roasters do not include a separate cooling bin; instead, room temperature air is passed through the roasting chamber at the end of a batch to cool the beans. This system is not ideal because the chamber’s surfaces are hot, which inhibits the cooling process. Many users of fluid-bed roasters buy and use separate cooling bins.
Advantages: Fluid-bed roasters are affordable and reliable, have a small footprint, and pose little risk of bean-surface burning.
Disadvantages: Excessive airflow damages flavor and decreases fuel efficiency; the machine operator must compromise between the gas and airflow settings desired for optimal flavor and those required for proper bean rotation.
A fluid-bed roaster transfers heat to beans almost exclusively by convection. Air heated in the burner box (l) passes through the roasting chamber (2) and leaves the roaster through the chimney, while the cyclone (3) traps chaff. The beans enter the roaster through the funnel (green), circulate on a bed of hot air in the roasting chamber, and exit the roasting chamber through a door (not shown).
Recirculation
In contrast to the single-pass roasters listed above, recirculation roasters send a portion of a roast’s exhaust air back through the burner chamber to recapture its heat, thereby decreasing the fuel requirements of the roasting process. These machines have recently become popular by virtue of being very fuel efficient, limiting bean-surface burning, and providing a very stable, moist, and repeatable roasting environment. The stable environment offers the side benefit of improving the ability of automated roasting software to track a programmed roast profile. The one significant drawback to these machines is a higher risk of smoky flavors in the coffee due to the beans dwelling in smokier air during roasting.
Advantages: Recirculation roasters offer fuel efficiency and fast roasting, with limited risk of bean-surface burning. They facilitate performance of automated profiling software, if any is used.
Disadvantage: Roasters sometimes report development of smoky flavors.
This recirculation roaster sends most of the exhaust air back through the drum and transfers heat almost exclusively by convection. In this design the burner also serves as the afterburner, incinerating particulate in the exhaust air before sending a portion of it up the chimney. The white arrows represent airflow. As in the drum-roaster illustration, beans enter the roaster through the green funnel, roast in the roasting drum (orange), and cool in the cooling bin (blue).
The Lilla (left) is on early attempt at a recirculating-air design, while the Loring is the best-in-class design. Progression of a Roast
Roasters tend to focus most on the first and last stages of a roast batch, known respectively as the “drying phase” and “development time.” While these terms have some validity, they’re oversimplifications that can lead to misunderstanding of the roasting process. As we’ll see, the entire roast curve influences drying and development during roasting.
The Illusion of the S Curve
Roast profile curves generally follow an “S” curve in which bean temperature drops precipitously for 70-90 seconds, bottoms out, and then rapidly increases. In reality, bean temperature does not drop: The beans enter the roaster at room temperature and immediately get hotter. The apparent initial temperature decrease is an artifact of the air in the roaster influencing the bean probe, as well as the probe’s thermometric lag. I recommend not getting too hung up on the first 2-3 minutes’ worth of bean-probe readings; in most roasting machines the bean probe becomes a useful guide sometime during the third minute.
The S curve is the standard representation of bean-probe temperature readings during a roast. After bottoming at "the turn,” the probe’s readings increase rapidly at first and then at progressively slower rates throughout the remainder of a roast.
I cannot overemphasize this fact: The bean-probe readout is merely a proxy for the surface temperatures of the bean pile. It does not perfectly represent the surface temperatures of the beans. It’s not necessarily that the probe is inaccurate; the probe is merely doing its job of reading the temperature of the media in which it is immersed. In the case of coffee roasting, that medium is a combination of beans and hot gases.
As the graphic above shows, beans lose moisture at a steady rate until first crack. (Adapted with gracious permission from: Bottazzi, D.; Farina, 5.; Milani, M.; Montorsi, M. (2012) A numerical approach for the analysis of the coffee roasting process. Journal of Food Engineering. H2, 243-252. Original data compiled by: Schenker, S. (2000) Investigations on the hot air roasting of coffee beans. Swiss Federal Institute of Technology, Zurich.)
The Middle (Nameless) Phase
At a few minutes into a roast, once the beans have turned a shade of tan or light brown, begins the neglected, nameless, middle phase. During this phase sugars break down to form acids19 and the beans release steam, begin to expand, and emit pleasant, bready aromas. The changes in color and aroma are largely the work of Maillard reactions, which accelerate as bean temperatures reach approximately 250°F-300°F (121°C-149°C).
At approximately 340°F (171°C), caramelization begins, which degrades sugars, thus slowing the Maillard reactions by stealing their fuel. Caramelization deepens the beans’ brown color and creates fruity, caramelly, and nutty aromas. Both Maillard reactions and caramelization decrease coffee’s sweetness and increase bitterness.
During this (nameless) phase, expansion of the beans causes them to shed their chaff, or silver skin. Simultaneously, smoke develops, and the machine operator must ensure the airflow is high enough to exhaust the chaff and smoke as it forms. Inadequate airflow at this stage may lead to smoky-flavored coffee and could create a fire hazard if chaff builds up excessively in certain areas of the roaster.
First Crack
While the process of roasting beans can be monotonous at times, first crack is always exciting. The bean pile emits a series of popping noises that begins quietly, accelerates, reaches a crescendo, and then tapers. The beans spontaneously expand and expel chaff, and smoke development intensifies. As noted earlier, first crack represents the audible release of pent-up water vapor and CO2 pressure from the bean core.
According to Illy5 and Eggers,30 bean surface temperatures decrease for a brief period (probably several seconds, though your bean probe will likely not indicate this change), a phenomenon known as the endothermic flash. The flash is due to the surface-cooling effect of evaporation as large amounts of water vapor escape the beans.
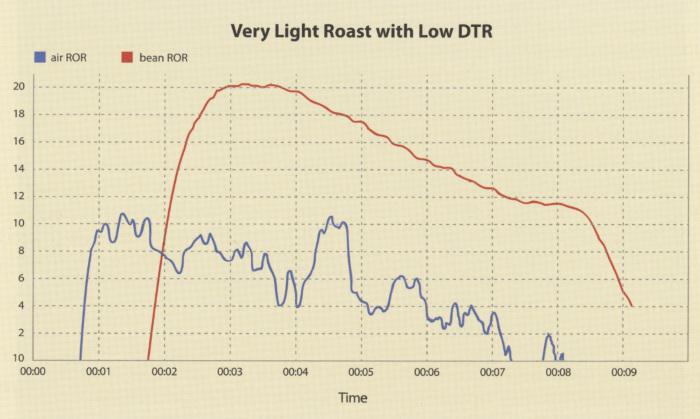
Shortly before first crack, the bean-pile temperature’s rate of rise (ROR) is prone to level off. It tends to plummet at around the time of the endothermic flash and will often accelerate rapidly after the flash. These shifts in the ROR are undesirable, and I discuss them in depth later in this book. (See “The Bean Temperature Progression Shalt Always Decelerate” in Chapter 10.)
Acidity increases during roasting until the beans reach a city roast and declines with further roasting. Aromatics peak shortly afterward, in the range of city to full city roast. Body increases until a roast reaches a very dark color somewhere in the vicinity of French roast, after which body declines. Extraction potential is maximized at a French roast and decreases thereafter as pyrolysis burns off soluble mass.
Second Crack
After the completion of first crack there is a quiet lull during which CO2 pressure builds anew in the bean core. The pressure is able to force oils to the bean surface because pyrolysis and the trauma of first crack have weakened the bean’s cellulose structure. Right around the time the first beads of oil appear on bean surfaces, second crack begins, releasing CO2 pressure and oils from the inner bean.
Roasting into second crack destroys much of a coffee’s unique character because caramelization and pyrolysis yield heavy, pungent, and roasty flavors that overwhelm whatever subtle flavors survive such dark roasting. In the cup, dark roasts exhibit bittersweet and smoky flavors; heavy, syrupy body; and minimal acidity. If roasting is taken much further than early second crack, then burnt, carbonized flavors appear and body declines. While perhaps the majority of specialty coffee chains roast into second crack, today’s progressive specialty roasters rarely do.
Development Time
Many roasters refer to the time from the onset of first crack until discharging the beans as “development time.” This is a misleading term that oversimplifies the roasting process. As shown in the graph “Inner Vs. Outer Bean Temperature,” in Chapter 6, after the first several seconds a batch is in the roaster, inner-bean development occurs continually until the end of the roast. Roasters often attempt to improve development, especially in roasts for espresso, by lengthening the roast time after first crack. Extending the roast time after first crack will usually increase development of the bean core, but the more efficient way to improve inner-bean development is to create a larger temperature gradient earlier in the roast. Intentionally extending the last few minutes of a roast usually creates baked flavors and should be avoided.
It is vital to understand that the shape of the entire roast curve influences bean development and moisture loss. In Chapter 10, “The Three Commandments of Roasting,” I discuss how to shape the roast curve to enhance bean development and sweetness while eliminating the risk of creating baked flavors. Planning a Roast Batch
A roaster must make many decisions before charging a batch of coffee. He must consider batch size, machine design, and various bean characteristics before choosing the charge temperature, initial gas setting, and airflow.
Batch Size
The first step when planning a roast is to determine a machine’s optimal range of batch sizes. One must consider a machine’s drum size, airflow range, and rated burner output to decide what batch sizes will taste best. One should not assume that a roaster’s stated capacity is its optimal batch size; I have found that many, if not most, machines produce the best coffee at 50%-70% of their nominal capacity.
Roasting machine manufacturers are motivated to exaggerate their machines’ capacities because most buyers, especially of small, specialty machines, are influenced by that headline number.* One can estimate a machine’s realistic maximum batch size by first noting the machine’s stated capacity. That number most likely represents the largest batch a roaster should attempt to put into that machine’s drum. Filling a drum past its stated capacity may lead to less effective mixing of beans during roasting or to the exhaust fan sucking beans out of the roaster.
Setting Airflow
For years I’ve been adjusting airflow settings based on a simple test using a cigarette lighter. To perform the test, remove the trowel from the machine while a batch is roasting and the gas is on. Hold a lit cigarette lighter up the trowel hole and note whether the flame leans toward the hole, away from the hole, or remains vertical. Adjust the airflow such that the flame leans gently toward the hole, indicating a slight draw. (Increasing the airflow will pull the flame more strongly.) If the flame does not lean toward the hole, there is insufficient draw to adequately exhaust the waste products of combustion and roasting. A flame pulling strongly toward the hole, or extinguished by the airflow into the hole, indicates too much draw.
A similar test may be done by holding a small, thin piece of paper, larger than the trowel hole, up to the hole. A reasonable airflow setting should provide just enough draw to hold the paper against the hole so that it won’t fall if you let go.
Coffee roasting requires less airflow earlier in a roast and more airflow later. Once the beans begin to emit smoke and shed chaff, more airflow becomes necessary. Increasing the airflow during a roast increases convective heat transfer, so, if possible, increase airflow gradually and incrementally. A large one-time increase in airflow may interfere with the smooth deceleration of the bean-temperature progression. (See “The Bean Temperature Progression Shalt Always Decelerate” in Chapter 10.)
Some roasting machines with fuel injectors, or “power burners,” require the airflow and gas settings to increase and decrease in tandem to maintain a constant air:fuel ratio for efficient combustion. This presents a conundrum for the machine operator, since ideal roasting calls for gas settings to begin high and remain steady or decrease throughout a batch and for airflow to be relatively high later in a batch. There is no wide-ranging solution to this problem with power-burner machines, as they’re all different, and roasters must address this situation on a case-by-case basis.
Plan a roast’s airflow settings ahead of time, knowing what the initial airflow will be, when the roast’s airflow will change, and by how much. Between batches, low-to-moderate airflow is appropriate, as it allows the operator to maintain a steady environmental temperature without using an unnecessarily large flame. Charge Temperature
The charge temperature*** and initial gas setting of a batch are critical determinants of the course of a roast profile. Charging at too low a temperature can limit bean development or force the use of an excessive initial gas setting, causing the drum to overheat. Charging too hot can burn a bean or blunt some of the delicacy of its potential flavor. Knowing how to balance charge temperature and initial gas setting, as well as how to manage a roaster before charging, are essential to ensuring that every batch follows an optimal profile. To determine the charge temperature, one must consider roasting-machine design, batch size, bean density, bean size, bean-processing method, and intended roast time. Machine Design
The first step in choosing a charge temperature is to consider the type of roasting machine one is using. A machine with direct contact between the flame and drum has a hotter drum, relative to the roasting environment, than does a machine that heats the drum indirectly. One must limit charge temperatures when using directly heated drums because such drums pose greater risk of scorching the beans.
Fluid-bed roasters, lacking drums and conductive heat transfer, can accommodate the hottest charges, at well over 550°F (288°C). Indirectly heated drum machines and machines with perforated drums can handle hot charges in the range of 450°F-525°F (232°C-274°C). Classic drum roasters require varying degrees of caution, depending on the thickness and material of the drum and whether it is single- or double-walled. Reasonable charge temperatures range from 380°F-440°F (193°C-227°C).****
As noted earlier, the drum in a classic drum roaster acts as a heat-storage device, storing tens of thousands of kilojoules of heat energy. This stored energy contributes to heat transfer early in a roast and compensates for some or all of the lower charge temperatures that directly heated drums demand. Adequate heat transfer during the first minutes of a roast is critical to inner-bean development. (See “Thou Shalt Apply Adequate Energy at the Beginning of a Roast” in Chapter 10.)
Batch Size
The larger the batch, the greater the drop in a roaster’s environmental temperature upon charging. Therefore, larger batches require hotter charge temperatures to ensure sufficient heat transfer during the first minute or two of a roast.
Bean Density
For a given bean size, it requires more energy to penetrate the core of denser beans. Charging hotter is often appropriate for exceptionally dense beans.
Bean Size
Because a larger bean has more distance from its surface to its core, penetrating a larger bean requires more energy.
Bean Processing Method
The processing of green coffee affects its density, its susceptibility to burning, and, often, its moisture content. When planning a roast, one must consider green processing on a case-by-case basis due to the myriad variables it involves. As a rule, washed-process coffees require, and can tolerate, hotter charging temperatures than natural-process ones can.
Intended Roast Time Charge temperature and roast time must be considered together. All else being equal, one should charge hotter when roasting faster. A faster roast calls for establishing a larger AT early in the batch to ensure sufficient development. Insufficient charge temperature will impede inner-bean development. Likewise, slower roasts call for cooler charges. Charging a long roast at too hot a setting will force the machine operator to slow the roast excessively, at some point, in order to extend the total roast time. Such deceleration may create baked flavors or inhibit development.
One must consider all six of the preceding variables (machine design, batch size, bean density, bean size, bean processing method, and intended roast time) when deciding an appropriate charge temperature for a batch. For example, in a 30 kg-capacity classic drum roaster, one may charge a 12-minute, 25 kg batch of large, dense, washed Kenya AA beans at 430°F (221°C). In the same machine, the roaster may choose a 380°F (193°C) charge for a 15-minute, 20 kg batch of a small, low-density, naturally processed Brazilian. (Please ignore the unusual choice to roast the larger batch of Kenya so much faster than the Brazilian.)
In these examples, the classic drum roaster calls for a modest charge temperature for both batches. The Kenya’s larger batch and bean sizes, greater density, and washed processing each contribute to its need for a hotter charge than the Brazilian requires. Please note that these examples are hypothetical, and your beans and machine may require radically different temperatures.
Determining Roast Time
The roasting industry harbors a nearly universal misconception that slower roasting yields better development. While it’s true that roasting too fast will produce underdeveloped coffee, roasting slowly will not necessarily ensure good development. It is neither total roast time nor “development time” that determines final development. The shape of the entire roast curve influences development.
Assuming the size of a roast batch is less than or equal to a machine’s realistic capacity (see “Batch Size” in Chapter 9), a wide range of roast curves and times can create coffee with good development and flavor. I cannot tell you the exact, optimal time range for roasts in your machine, but I offer the following suggestions as rough estimates.
Drum RPM One should set the revolutions per minute (RPM) of the roasting drum’s rotation primarily based on the drum’s inner diameter and the size of a roast batch. The RPM setting should provide optimal mixing of the beans to create an even roast while minimizing the risk of bean-surface burning. Based on my experience and an informal survey of several roasting companies, I recommend the following guidelines for drum RPM when roasting batches of 60%80% of stated capacity.
Suggested Drum RPM
These numbers are meant as rough guides based on typical drum dimensions. The true evidence of appropriate drum RPM is the uniform mixing and roasting of the beans and the minimization of bean-surface burning.
Roasters should consider the following factors when setting drum RPM:
Higher drum RPM slightly increases airflow and convective heat transfer. Smaller batches call for lower drum RPM.
If your machine’s drum speed is easy to adjust, consider gradually increasing the rotation by a few RPM as a batch progresses. This will maintain even mixing and rotation of the beans as they expand. (Think of the expansion of the beans as akin to an increase in batch size.)
A well-functioning body, sweating at a steady rate, is the equivalent of a smoothly declining ROR. On the other hand, the forgetful body that overheats and then rapidly cools is like the typical ROR curve that levels off or rises just before first crack, and then crashes after first crack begins.
First crack represents a release of moisture analogous to a human sweating. in the case at coffee roasting, it’s intuitively appealing to have all at the beans crack at the some moment, as that would imply the beans were all roasting at the same rate. However, in a roasting machine full at beans, it too many beans crack at the same time, their cumulative moisture release would cool the roasting system too much (resulting in the ROR crash) and slow or stall the roast.
However, it a roaster plans to end a batch during first crack, it may be wise to enter first crack with more momentum, to attempt to make the beans crack almost simultaneously, and drop the batch before the roasting environment cools too much.
A medium roast with a smooth ROR and 20% DTR
A very light roast with high ROR entering first crack and low DTR
* I compiled and evaluated my roast data by using a pencil, calculator, and spreadsheet. These days one can analyze such data much more efficiently with the aid of computer software such as Cropster’s “Roast Ranger” application.
** The ROR’s tendency to accelerate around both cracks presumably indicates two exothermic phases.
*** I consider the beginning of first crack to be the moment the operator hears more than one or two isolated pops. Mastering Consistency
Much like the elusive “God shot” of espresso, most companies roast the occasional great batch but can’t seem to reproduce it consistently. Variations in a roaster’s thermal energy, green-coffee temperature and moisture, ambient conditions, and chimney cleanliness all collude to make roasting inconsistent. I’ve designed the tips in this chapter to help you control or lessen the impacts of these factors. Following these recommendations will help any roaster improve consistency.
How to Warm Up a Roaster
At a cupping of some lovely Cup of Excellence coffees a few years ago, I noticed that one of the samples was very underdeveloped and another was slightly underdeveloped. The other cups had varying degrees of good development. It dawned on me that those two cups had been brewed from, respectively, the first and second batches roasted that day. I suggested to my cupping host the order in which he had roasted the samples that morning. I had guessed the order correctly.
Every roaster I’ve ever asked has admitted to having difficulty with the quality of the first few batches of a roasting session. The problem is usually caused by inadequate warming up of the roasting machine. Most machine operators warm up a roaster to the charge temperature and then idle the machine at or near that temperature for some amount of time, usually 15-30 minutes, before charging the first batch. This protocol guarantees that the first batch will roast sluggishly compared with successive batches.
The problem is that temperature probes are poor indicators of a machine’s thermal energy. (See “Charge Temperature” in Chapter 9.) As a cold roasting machine warms up, although the temperature probes quickly indicate that the air in the machine has reached roasting-level temperatures, the mass of the machine is still much cooler than the air in the drum. If one charges a batch at this point, the machine’s mass will behave akin to a heat sink and absorb heat from the roasting process, decreasing the rate of heat transfer to the beans. After several roast batches, the machine’s thermal energy will reach an equilibrium range within which it will fluctuate for the remainder of the roasting session.
The trick to normalizing the results of the first few batches of a roasting session is to seemin   Что способствует осуществлению желаний? Стопроцентная, непоколебимая уверенность в своем...  Что вызывает тренды на фондовых и товарных рынках Объяснение теории грузового поезда Первые 17 лет моих рыночных исследований сводились к попыткам вычислить, когда этот...  ЧТО ПРОИСХОДИТ, КОГДА МЫ ССОРИМСЯ Не понимая различий, существующих между мужчинами и женщинами, очень легко довести дело до ссоры...  Конфликты в семейной жизни. Как это изменить? Редкий брак и взаимоотношения существуют без конфликтов и напряженности. Через это проходят все... Не нашли то, что искали? Воспользуйтесь поиском гугл на сайте:
|